This post is something of a reminder to myself. How to renew a NameCheap Comodo SSL certificate on one of my Linode Apache2 web-servers. It’s something I only have to do every few years so I essentially have to re-learn the process every time which is rather tiring. This post will be here for my future self to make the process easier.
1. Renew the SSL Certificate on NameCheap
I use NameCheap for all my domain name registrations and SSL certificates. They have many different types of SSL certificates available from several different providers ranging from simple domain certificates right up to full wildcard organization based certificates. The great thing about any of them is that NameCheap will email you well in advance of them expiring. When they do so it’s simply a matter of logging into your NameCheap control panel and renewing the certificate. A new entry will be created with the status of “Waiting Activation”.
2. Create the CSR File
My host runs apache2 on Ubuntu and OpenSSL. Apache looks for certificates in /etc/apache2/ssl and I usually create a sub-folder for new CSR and key files when the old ones expire. I feel its a bit more secure to generate a new Certificate Signing Request (CSR) whenever a certificate expires, which is why I do this. So I create a folder for the files:
cd /etc/apache2/ssl
mkdir december-2014
cd december-2014
Then create a CSR file using:
openssl req -newkey rsa:2048 -days 1095 -nodes -keyout www.my-domain.com.key -out www.my-domain.com.csr
The openssl req command will then ask for some information to encode with the request. That looks something like below. Make sure when entering the FQDN that you enter the bare domain (ie no www).
You are about to be asked to enter information that will be incorporated
into your certificate request.
What you are about to enter is what is called a Distinguished Name or a DN.
There are quite a few fields but you can leave some blank
For some fields there will be a default value,
If you enter '.', the field will be left blank.
-----
Country Name (2 letter code) [AU]:AU
State or Province Name (full name) [Some-State]:South Australia
Locality Name (eg, city) []:Adelaide
Organization Name (eg, company) [Internet Widgits Pty Ltd]:My Company Name
Organizational Unit Name (eg, section) []:
Common Name (eg, YOUR name) []:mydomain.com
Email Address []:admin@mydomain.com

Please enter the following 'extra' attributes
to be sent with your certificate request
A challenge password []:
An optional company name []:My Company Name
This will create the CSR file (www.mydomain.com.csr) and a SSL certificate key file (www.mydomain.com.key). The key needs to be protected with:
chmod 400 www.mydomain.com.key
3. Issue the SSL Certificate via NameCheap
The contents of the CSR file are needed to issue the SSL certificate via the NameCheap control panel. View the contents with:
more www.mydomain.com.csr
The contents will look something like this:
-----BEGIN CERTIFICATE REQUEST-----
123DQDCCAigCAQAwgbAxCzAJBgNVBAYTAkFVMRgwFgYDVQQIEw9Tb3V0aCBBdXN0
cmFsaWExETAPBgNVBAcTCEFkZWxhaWRlMSAwHgYDVQQKExdUaW1lc2hlZXRzIE1U
UyBTb2Z0d2FyZTEkMCIGA1UEAxMbd3d3LnRpbWVjbG9ja210cy1vbmxpbmUuY29t
MSwwKgYJKoZIhvcNAQkBFh1hZG1pbkB0aW1lY2xvY2ttdHMtb25saW5lLmNvbTCC
ASIwDQYJKoZIhvcNAQEBBQADggEPADCCAQoCggEBAOeLw456FYT+reZ8VH2PFD6B
pxk4NGHczMeAajXVabF/O+KBTqveBeqCEoXQzPO7Z4rovVdNJp5z06t54mOmILue
pENONp7mmfLMaPrvPrunOzdCo1ltoegNhQh+SYK0gY2SoMA69hEm2jgDL9umBueY
7kSCa/p0p7znZWCxt1yFf/5VhKVgXgh0C+6PD9VJp4nEBYcVSwOlbuHi1gsCFmwb
DXOpU6vAK61Ot43AaOdWGN8Aao9GqvMPDyV1hW0GcH/WCyAD19u5YUSz2jZP9qnc
MP1IhDD2smz24qkdZD8/LwPusEnAILL8HVp3z5v+4FMAVHWWNGj6X+ZgNQYPlFUC
AwEAAaBKMCAGCSqGSIb3DQEJBzETExFzb2dneWhvcnNlYmlzY3VpdDAmBgkqhkiG
9w0BCQIxGRMXVGltZXNoZWV0cyB789MgU29mdHdhcmUwDQYJKoZIhvcNAQEFBQAD
ggEBAIj4cddghuRyEGcJvSzsdarfaIHIUHUUN9kc9udsqS0pNcnk0s4xBMz2E72R
0ArwP43QBAiA8x8aganbqcj5WB+bDhasTDCBlOomeplQJ4LsYwdd2geMTxrxsoaq
VXc5TaS9Ct+vGqDIg+tQmd8PbGk2m3zzGFeacGn42xnRGBxe21eSmkMo4yPF7KZl
h/M5l6kZFhejSSM+jyvXqMaRjX4gtQxloXisUxiyxO2mSA5gc0p4/tJ+oC1Dj3mw
rE3EYcoOi1XkAcuflLhp/YN4COd/TkH5DwwKCMJOvmuWdqurxjXIqlxlBchqb9Ml
SXCA5yk12345678wOayT2/kQJG0=
-----END CERTIFICATE REQUEST-----
Copy the contents to the clipboard and go to your NameCheap control panel and select the SSL certificate to activate. Select the correct server configuration (in this case Apache2 + OpenSSL) and paste the contents of the CSR file into the CSR Text field and submit the activate request. NameCheap will then ask for an email address to confirm the issuing of the SSL certificate for the domain. Confirm the request and next you’ll have to confirm that you actually own the domain. Namecheap offers three alternatives for this, file validation, DNS validation and email validation.
File Validation
File validation involves downloading a file from Namecheap and uploading it to the /.well-known/pki-validation folder of your website. You must make sure that the file is accessible from both the naked and www addresses of your website for this validation to complete properly. This means disabling any non-www to www redirects. This is OK if you’re not running WordPress, but if you are running WordPress this can be difficult. If you are running WordPress I’d suggest using Domain or Email validation.
DNS Validation
DNS validation involves creating a CNAME DNS entry for the domain you want to validate. The CNAME entry is available from Namecheap. This is the best approach for WordPress websites if you do not have emails available.
4. Confirm the SSL Certificate Issue
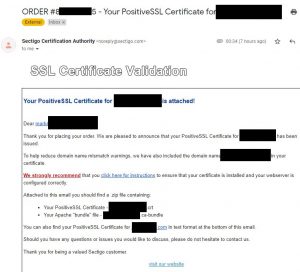
The SSL certificate I renewed was a Comodo certificate and after a few seconds I got an email from Comodo asking me to confirm the issuing of a certificate. The email looked like this:
It’s simply a matter of clicking on the confirmation link in that email and pasting the “validation code” into a text box on the resultant web page. Once you’ve done that another email will arrive in a few minutes with a ZIP file attached. The zip file contains the following files:
The AddTrustExternalCARoot.crt is the CA (certificate authority) root certificate which identifies the company we’ve paid to issue the SSL certificate. In this case, Comodo via NameCheap. You’ll need that file. You’ll also need the www_mydomain_com.crt file which is the signed CSR.
5. Install and Protect Certificate File
Both files mentioned above need to be copied to the folder we created in step 1, namely:
/etc/apache2/ssl/december-2014/
Once there protect the signed crt file with:
chmod 400 www_mydomain_com.crt
6. Configure Apache to use New SSL Certificate
The last step in the process is to configure Apache to use the new SSL Certificate. Open up the site configuration file with:
nano /etc/apache2/sites-available/site-name.conf
In my case I looked for the SSL VirtualHost section of the file which looked like this:
<VirtualHost  222.222.222.222:443>
    SSLEngine On
    SSLCertificateFile /etc/apache2/ssl/december-2011/www.mydomain_com.crt
    SSLCertificateKeyFile /etc/apache2/ssl/december-2011/www.mydomain.com.key
    SSLCertificateChainFile /etc/apache2/ssl/december-2011/www.mydomain.com.ca-bundle
    ServerName www.mydomain.com
    ServerAdmin general@mydomain.com
    ServerAlias mydomain.com
    DocumentRoot /srv/www/public_html/
    ErrorLog /srv/www/logs/error.log
    CustomLog /srv/www/logs/access.log combined
    AddHandler cgi-script .cgi .pl
</VirtualHost>
You can see that the SSLCertificateFile SSLCertificateKeyFile and SSLCACertificateFile directives need to be changed to use the new certificate files. I modified them to look like this:
<VirtualHost  222.222.222.222:443>
    SSLCertificateFile /etc/apache2/ssl/december-2014/www_mydomain_com.crt
    SSLCertificateKeyFile /etc/apache2/ssl/december-2014/www.mydomain.com.key
    SSLCertificateChainFile /etc/apache2/ssl/december-2014/www.mydomain.com.ca-bundle
Saved the file, exited Nano and then reloaded Apache with:
service apache2 reload
8. Verify New Certificate is Installed
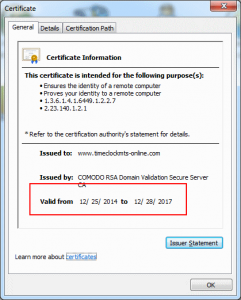
If you’ve done everything correctly it’s a simple matter of checking if the certificate is installed correctly. I did it by navigating to the website in Google Chrome and clicking on the https padlock icon and viewing the certificate information. It looked like the image below and you should see that the expiry date has updated correctly. Job done.


