Category Archives: Software

Last updated by at .

Use Javascript to Copy to the Clipboard

I’ve found it very useful to be able to copy web-content to the clipboard. For example, to generate boiler plate text in my online customer management system and paste it into Outlook for emailing. I’ve needed to use it a few times over the last couple of years and my go-to reference has usually been this Stack Overflow post. It basically comes down to whether or not a browser supports execCommand(‘copy’), if it does then you’re set. In it’s most basic form you can copy the content of a DIV with something like this:

function copyToClipboard(element_to_copy){
    //create an input range object to hold the DIV to copy
    var range = document.createRange();
    //select the node containing the element to copy
    range.selectNode(element_to_copy);
    //clear the current selection
    window.getSelection().removeAllRanges();
    //add the selected range to the current selection
    window.getSelection().addRange(range);
    //run exeCommand to copy 
    document.execCommand('copy');
    //clear the selection
    window.getSelection().removeAllRanges();
}

This method uses the input range object which can hold HTML values. It’s a HTML5 object and not supported in IE9 and earlier. The function is creating a new Range object, loading the content of the element we want to copy, clearing the current selection of all other ranges, adding the new range to the selection and then running execCommand(‘copy’) to put the contents into the clipboard.

Here’s a variation I’ve used that creates an input field temporarily to hold the content we want to copy. This is useful as it has wider support that that used above as it doesn’t rely on the Range object. Care must be taken, however, to replace single quotes with ' before putting content into the value attribute of the input.

function copyToClipboard(element_id) {
  var input_placeholder = document.createElement("input");
  input_placeholder.setAttribute("value", document.getElementById(element_id).innerHTML);
  document.body.appendChild(input_placeholder);
  input_placeholder.select();
  document.execCommand("copy");
  document.body.removeChild(input_placeholder);
}  

Dual SHA256 / SHA1 Windows App Code Signing

I wrote about digitally signing programs for Windows a few years ago. Microsoft announced last year that windows would no longer trust files signed with the SHA-1 algorithm after 1 January 2017. This causes some problems with older operating systems (like XP SP2 and Vista) as they do not support the SHA256 algorithm for certificates used to sign programs/apps. To maintain compatibility with ealier versions Microsoft suggests dual signing with both the SHA1 and SHA256 certificates. It turns out my certificate (from Comodo and issued in mid-2015) supports both the SHA1 and SHA256 algorithm so it’s not a big hassle for me. However, some older certificates (that have not expired) may need to be re-issued by the issuing authority, some certificate issuers such as K-Software are issuing replacements for free.

Here’s what I had to do to sign my EXE files with both SHA1 and SHA256 versions of my certificate.

1. Download an up-to-date version of the signtool.exe file from Microsoft. Such as this one from the Windows 8.1 SDK.
2. My certificate was installed automatically by Comodo when I purchased it so it needed to be exported to a PFX file. You’ll need to know what the password for your certificate was when you purchased it. There’s a decent tutorial covering this process here.
3. Work out the new commands to dual sign your EXE files. In my case they look something like this.

//Code sign with SHA1
signtool.exe sign /f "c:\path\to\pfx-file\my-pfx-file.pfx" /p mypfxpassword /t http://timestamp.comodoca.com /v c:\Path\To\File\somefile.exe

//Code sign with SHA256
signtool.exe sign /f "c:\path\to\pfx-file\my-pfx-file.pfx" /p mypfxpassword /fd sha256 /tr http://timestamp.comodoca.com/?td=sha256 /td sha256 /as /v c:\Path\To\File\somefile.exe

It’s important to use the /fd and /td switches on the second call to ensure both the file and date/time stamp are SHA256 signed. I actually wrote a little batch file to automate the dual signing of files. I call the file from my various build scripts to sign both my program executables and installers. Here’s that file:

@echo off
echo ************************************************ 
echo Running %0
IF %1=="" GOTO InvalidParameter
IF not exist %1 goto InvalidFile  
echo Signing %1
echo Signing with sha1

"d:\code signing 256\signtool.exe" sign /f "c:\path\to\pfx-file\my-pfx-file.pfx" /p mypfxpassword /t http://timestamp.comodoca.com /v %1

echo Signing with sha256
"d:\code signing 256\signtool.exe" sign /f "c:\path\to\pfx-file\my-pfx-file.pfx" /p mypfxpassword /fd sha256 /tr http://timestamp.comodoca.com/?td=sha256 /td sha256 /as /v %1
echo Signing completed Successfully
goto eof

:InvalidParameter
echo You must pass this script a file to sign
goto eof

:InvalidFile
echo %1 does not exist
goto eof

:eof
echo ************************************************ 

You can easily check if you’ve dual signed correctly from within Windows 10 by right clicking on your signed EXE file, selecting Properties and then clicking the Digital Signatures tab. If it’s done right it should look something like the screen below. Note that both the SHA1 and SHA256 certificates are present.

Dual Code Signed EXE File

Dual Code Signed EXE File

Copy Element to Clipboard Using Javascript

Over the years I’ve built a web based system that controls most of the sales and support aspects for my software. This includes tracking sales, editing sales, supplying customers with registration keys, prompting them to renew support, and so on. There’s also a search interface that allows me to find customer sales details, registration keys, and to check if they have current support. I use this search interface multiple times a day and when I need to find a registration key or need to remind a customer that their support has expired the system outputs the email text I need to send to the customer to the browser window. Then I select it, and paste it into my emails.

This morning I thought it would be really neat if I could cut out the select and copy steps and have JavaScript copy it into the clipboard for me. Last time I checked this (5 years ago) it wasn’t possible without Flash. Now it turns out you can use the Web API that most modern browsers support to do it.

I wrote this little JavaScript function that I can pass a HTML element ID to and it copies the contents to the clipboard.

function copyToClipboard(elem)
{
	//create a new range to hold the DIV to copy
	var range = document.createRange();
	//select the not containing the element to copy
	range.selectNode(elem);
	//clear the current selection
	window.getSelection().removeAllRanges();
	//add the selected range to the current selection
	window.getSelection().addRange(range);
	//run exeCommand to copy 
	document.execCommand('copy');
	//clear the selection
	window.getSelection().removeAllRanges();
}

The key here is the document.execCommand(‘copy’) call which sends the contents of the element to the clipboard so I can paste it into my email tool. Triggering the function is pretty simple with something like this:

document.getElementById('copy-link').addEventListener('mousedown',copyToClipboard("element-id"));

I found a couple of other solutions that copied to the clipboard by copying the element contents to temporarily created <textarea> but the issue with this was that the HTML formatting was not copied. I needed this so that my support emails maintained my standard CSS styling.

%ProgramData% and Roaming Profiles

All of my desktop products use the Windows %ProgramData% folder to store files such as configuration files, log files, database files and so on. Basically any file that needs to be written to is stored there. It’s simply not good practice to store files that need to be written to in the %ProgramFiles% folder because there’s no guarantee the Windows user will have write permissions on files stored there. Now, usually the %ProgramData% folder can be found here:

c:\Program Data\

I store the data for each program in a folder something like:

c:\Program Data\Program Name\

That’s all dandy but when an application is 32bit Windows can be configured (via the UAC) to use a “VirtualStore” for any files that are modified and Windows considers that those files should be protected. I am not entirely sure why, but the ProgramData folder can be thrown in this boat and it ends up getting virtualized. The upshot of this is that when I go and take a look at a config file for one of my programs (in the C:\ProgramData\Program Name\ folder) the file is either empty or contains only the initial set of data. Yet, the program still runs perfectly and is saving config options without issue. So where is Windows actually storing the files that the software is changing? It’s here:

C:\Users\UserName\AppData\Local\VirtualStore\ProgramData\Program Name\

Hopefully this blog entry stops me from tearing my hair out in the future when I am looking for this location again!

Preloading Images with CSS

Here’s a helpful snippet that will preload images with CSS. Stops that annoying lag when using CSS to switch images and the image isn’t pre-loaded.

body:after {
	display: none;
	content: url("filename1.png") url("filename2.png");
}

Case Study – How Much Time are Employees Spending Working on Jobs?

Recently I’ve been working with a local truck re-finishing company. They work for their customers on a job-by-job basis, providing fixed priced quotes for each job. Obviously their profitability relies on them controlling both the time and materials spent on those jobs. Their billing, invoicing and payroll is controlled with MYOB, while employee time and attendance and tracking time spent on jobs is done via wall mounted Fingertec Timeline 100 time clock and Fingertec’s TCMSV2 time and attendance software. The time clock only allows for tracking of two digit job numbers which means job numbers must be re-used. There is no link between the TCMS software and MYOB.

The Client's Fingertec Timeline 100 Time Clock

The Client’s Fingertec Timeline 100 Time Clock

The Problem

The owner of the business has little or no idea of how much time employees have spent on jobs until the job is complete. This has lead to losses being made on jobs where better control could have resulted in less time being spent by employees. It has also lead to problems in quoting as it has been difficult for the owner to access historical cost information for jobs of a similar type. The reasons for the delay in reporting can be pinned down to the following root causes:

1. The employee responsible for monitoring time and attendance and generating job reports had little understanding of the TCMS software and was not willing to learn more. As a result reporting was largely a process of printing hard copy reports and manual calculations that were either wrong or severely delayed.

2. The TCMS limitation of two digit job numbers meant that the historical information stored by the system was useless. For example, job 89 in May could easily be a completely different job in December. The client controlled what each job code represented via a descriptor the TCMS software could store with each code. When a number was re-used the descriptor would be changed. However, the TCMS software only discriminated by job number.

3. Delays in reporting meant the owner was loathe to ask for reports as they took so long to generate and (appeared) to require a lot of work to generate.

The Goal

The goal of the project was to provide the owner of the business with a simple tool that could report on the time his employees spent working on customer jobs. The tool should be easy to use by admin staff and be able to generate reports in minutes rather than hours or days.

The Solution

I spent several hours familiarising myself with the TCMS software. The reason for this was two-fold. First to understand what data integration was possible, and secondly to investigate the TCMS software for automation opportunities to speed up the time and attendance reporting and payroll processing procedures. The second task lead to immediate cost savings within the business via the following:

1. Configuring TCMS to automatically round times to the nearest 15 minutes (previously done manually)
2. Set up overtime within the software to automatically determine daily overtime on week days and penalty overtime for employees working on weekends.

These two changes have immediately reduced the time taken to process payroll by 2-3 hours per week.

The TCMS reporting system can produce reports in a variety of formats. I was hoping the software could generate reports directly to MS Excel as this would have made my job a lot simpler. However, the Excel reporting system in TCMS is severely flawed resulting in a single report taking more than an hour to generate (I suspect due to not setting the Calculation property of Excel to xlCalculateManual). Further digging around indicated that CSV reports could be generated. In particular the TCMS “Job Cost Analysis” report could be generated in CSV format. The format was a simple flat file that included a record for each time punch pair, the employee, the date, and the recorded job number and job descriptor tag.

The Excel Job Reporter

I developed an Excel spreadsheet that could import the Job Cost Analysis CSV file from TCMS and then present the data to the business owner in a useful format. The spreadsheet allows the construction of a master list of current jobs so that monitoring of current spend of jobs is quick and easy. You can see what this job sheet looks like below. This report is generated daily and made available to staff so that they can see how much budget is available on their current jobs.

Excel Job Tracker - Current Job List

Excel Job Tracker – Current Job List

The system also allows the owner to easily see the time spent on any historical job by any employee. Incredibly useful for quoting of new jobs. You can see that report below.

Excel Job Tracker - Detailed Job Report

Excel Job Tracker – Detailed Job Report

A number of other reports are also available allowing the owner to see who has been spending time on what in the preceding day, week, or month.

The Benefits

The entire system was developed from start to finish in under 20 hours. The cost of the project is going to be recouped in lower payroll processing costs alone in about 3 months. The opportunities for better job cost control are likely to give multiples of project cost in savings and better quoting each month. All of this with some simple business process analysis, better use of the time and attendance software the client already owned, and making use of Excel.

Visual Basic 6 – Disable Min Max Buttons and Movable Property at Run Time

Recently I had need to allow one of my old Visual Basic 6 applications to run in “kiosk mode”. That is, maximize the window to fill up the screen, disable the form Min button, Max Button, Close button, prevent form re-sizing, and form dragging. There are properties to allow this at design time (MinButton, MaxButton, Movable etc) but they cannot be modified at run-time. So the problem was to set these properties at run-time. There was a quite bit of information online about it but nothing that tied it all up. Here’s my solution.

Firstly, it’s all done via API calls so you need to define a number of those as follows.

Public Declare Function GetSystemMenu Lib "user32" (ByVal hwnd As Long, ByVal bRevert As Long) As Long
Public Declare Function DrawMenuBar Lib "user32" (ByVal hwnd As Long) As Long
Public Declare Function GetMenuItemCount Lib "user32" (ByVal hMenu As Long) As Long
Public Declare Function ModifyMenu Lib "user32" Alias "ModifyMenuA" (ByVal hMenu As Long, ByVal nPosition As Long, ByVal wFlags As Long, ByVal wIDNewItem As Long, ByVal lpString As Any) As Long
Public Declare Function GetMenuString Lib "user32" Alias "GetMenuStringA" (ByVal hMenu As Long, ByVal wIDItem As Long, ByVal lpString As String, ByVal nMaxCount As Long, ByVal wFlag As Long) As Long
Public Declare Function GetSubMenu Lib "user32" (ByVal hMenu As Long, ByVal nPos As Long) As Long

Public Const MF_BYPOSITION = &H400&
Public Const MF_GRAYED = &H1&

Here’s how you put a form in “Kiosk Mode”. This code gets a reference to the system menu of the current form. It then loops through each sub menu item of the system menu getting the menu caption, it then disables the sub menu using the ModifyMenu API call. This API requires you to pass a new caption to the disabled menu item, so we just pass the menu captions back to the ModifyMenu call.

  Dim hSysMenu As Long
  Dim lngCount As Long
  Dim lngLoop As Long
  Dim strName As String
  Dim lLength As Long
  Dim hSubMenu As Long
  Dim sSubMenuName As String
  
  '
  'Get a reference to the system menu of the form
  '
  hSysMenu = GetSystemMenu(Me.hWnd, False)
  '
  'Set the border style to fixed dialog
  '
  Me.BorderStyle = 3
  '
  'Set window state to normal so we can re-size it
  '
  Me.WindowState = 0
  '
  'Set form width to screen width and position at top left of screen
  '
  Me.Width = Screen.Width
  Me.Height = Screen.Height
  Me.Top = 0
  Me.Left = 0
  '
  'If we got a reference to the system menu
  '
  If hSysMenu Then
    lngCount = GetMenuItemCount(hSysMenu)
    '
    'loop through each item in the system menu
    '
    For lngLoop = 0 To lngCount
      sSubMenuName = Space(256)
      '
      'get a reference to the sub menu
      '
      hSubMenu = GetSubMenu(hSysMenu, lngLoop)
      '
      'get the caption of the sub menu
      '
      lLength = GetMenuString(hSysMenu, lngLoop, sSubMenuName, Len(sSubMenuName), MF_BYPOSITION)
      sSubMenuName = Left(sSubMenuName, lLength)
      '
      'gray out (disable) the sub menu item
      '
      ModifyMenu hSysMenu, lngLoop, MF_BYPOSITION Or MF_GRAYED, hSubMenu, sSubMenuName
    Next lngLoop
    '
    'redraw the menu bar
    '
    DrawMenuBar Me.hWnd
  End If

The result of this is a form fills up all the screen space, and while there are min/max/close buttons they do not actually do anything. Right clicking on the menu bar shows the form system menu but all items are disabled. The form cannot be be re-sized or dragged.

Of course you’re going to want to get the form out of kiosk mode. This is actually pretty simple, just use the GetSystemMenu call again but pass TRUE as the second parameter. Here’s what I mean:

      hSysMenu = GetSystemMenu(Me.hWnd, True)
      DrawMenuBar Me.hWnd
      Me.BorderStyle = 2

According to the API documentation the second parameter (bRevert) when set to true resets the window menu back to the default state. Which is exactly what we want!

There’s other ways to do this of course. For example, the RemoveMenu API call could be called to remove the sub menu items altogether and then restored as I have above. However my solution works fine and I am pretty happy with the result!

Debugging a Visual Basic 6 Application Crash

In late 2012 one of my software products started failing on start up on certain computers.  The product is programmed in VB6 and uses a number of 3rd party controls. The concerning thing about it was that the product would run for months or even years on a computer and then one day, without warning, the software would start up, and display the dreaded “The Application has stopped working” message.  I must confess that for a long time I believed the issue was a minor one, and probably caused by a conflict with an anti virus program or similar.  I tended to (rather poorly) recommend rolling back Windows to an earlier point.  As the months rolled by I saw the issue on Windows Vista, Windows 7 (32 and 64 bit) and Windows 8 and 8.1.  Every 10 or 12 weeks I’d spend a day digging around on Google trying to get to the bottom of it with no luck.  For three reasons, firstly I had no real idea what I was looking for so my searching was rather aimless.  Secondly, I could never EVER ever reproduce the problem on any of the half dozen computers in my office, nor on innumerable VirtualBox machines.  And finally, I never really paid the problem the attention it deserved, which is entirely my fault.

The Dreaded Application Has Stopped Working Message

However, in the last month the issue seems to have become more common, with the occasional person reporting it in my software uninstall surveys, and long term users reporting the sudden failure of the software on their computers.  Of course, if it was failing for trial users it was costing me money, but I couldn’t measure the loss so I ignored it.  That changed in the last month when I had to give a number of refunds to users who bought software that suddenly stopped working.  Ouch.  So the bug was really starting to concern me and to be honest, I’d started losing sleep over it because I just couldn’t work out what was going on.  I was even considering re-coding the entire product in C#, not a small task with 75,000+ LOC in the Visual Basic code.  I’d be looking at 6 to 12 months to completion and then at least 6 months of quick release cycles to get the bugs ironed out.  Not an exciting prospect and I’d still have the bug gnawing away at my sales while I was beavering away on the re-write.  And I’ll be honest I didn’t want to move the application to .NET.  I’ve ported a VB6 application to C# before, and while the coding structure was much nicer, the actual speed of the application was FAR worse than the VB6 app and I’ve had to resort to all sorts of caching chicanery to get the performance to what is a barely acceptable level.

Matters Come to a Head

Things came to a head yesterday, with two new people informing me of the error and it was looking like I’d have to refund both of them for purchases made in the last few months.  I spent some time poking around on Google again yesterday and finally hit on something useful, how to create application crash logs.  It turns out getting an application to create a crash dump is as simple as adding one new Windows registry key:

HKEY_LOCAL_MACHINESOFTWAREMicrosoftWindowsWindows Error ReportingLocalDumps

When the application fails it creates a dump file here:

%LOCALAPPDATA%CrashDumps

I tested this on my local dev machine by triggering an application failure and creating a dump file, which I then could open in VS 2010. I couldn’t make much sense of it though. All I needed now was a machine that was experiencing the crash to create a dump file for me and perhaps I could get to the bottom of things.

Along Comes a White Knight

I had the first glimmers of the possibility of getting to the bottom of this vexing issue last night, when a long time user of my product reported that he was experiencing the issue. Recently my usual approach has been to ask if I can get a short time to access the problem computer remotely using my remote access tool of choice, Teamviewer. Sometimes people say yes, sometimes they so no. In the case of this particular customer, he said sure you can have access, and I’ll leave it on ALL NIGHT for you so you can take as long as you like. HUZZAH!

Grabbing the Crash Dump

I logged into the customer’s PC remotely and ran my software. Sure enough, it crashed on startup. Interestingly when it crashed I saw a flash of the main application window before the troublesome error box appeared. I then tried starting up the software with the application window minimized, and hey presto it ran. But as soon as I activated the window the software crashed again. This confirmed what I’d already suspected, that the crash had something to do with the first redraw/paint of the application window. Examining the log files my software creates showed what it usually did, the software crashes somewhere AFTER the first form resize event. Anyway, I’d confirmed that the crash I was seeing was the same one other people had seen. Time to create the Windows Registry key I mentioned earlier to have the software create a crash dump. I did that, ran the software to crash, and looked in the %LOCALAPPDATA%CrashDumps folder and there was my crash dump. Transferring the file to my own computer I wondered what to do next.

WinDBG is King

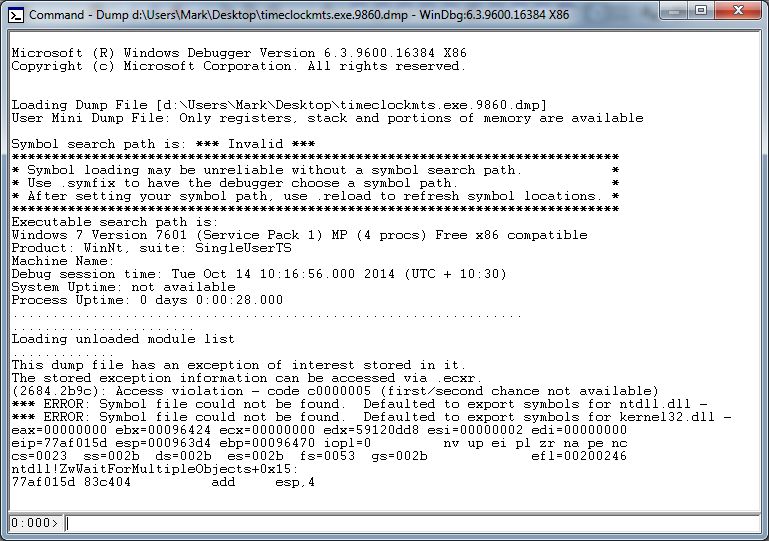
I’d already opened up a crash log in VS2010 and to be honest it meant nothing to me. So I tooled about for a bit on Google and it appeared that the tool of choice was “WinDBG”. I found an installer for it on windbg.org. Once installed it fired up and I loaded up my crash log and was shown this:

Crash Dump in WinDBG

Crash Dump in WinDBG

All very interesting but it doesn’t tell me much and the reason is on the 5th line of text “Symbol search path: *** Invalid ***”. Now, time for full disclosure, I am no computer scientist and my programming coursework was confined to PASCAL and I have little idea of computer architecture and a computer stack to me, is just a pile of computers. So, when I saw this message I had no idea what a “Symbol” was and had even less idea how WinDBG was going to help me. 10 minutes of research later I’d worked out that Symbols are used to decode the crash dump (which is essentially a memory dump) and allow WinDBG to display various function calls and function sources associated with the dump. Giving the debugger a symbol path is simple, just run the following command in WinDBG:

.sympath SRV*f:localsymbols*http://msdl.microsoft.com/download/symbols

Once that was done I could analyze the dump file again with:

!analyze -v

The analysis took a minute or so and the first thing of interest that popped up was:

*** ERROR: Symbol file could not be found.  Defaulted to export symbols for ciaXPLabel30.ocx - 
***** OS symbols are WRONG. Please fix symbols to do analysis.

ciaXPLabel30.ocx is a third party text label control used on the main form of the application. The same form that would partially re-draw before the fatal crash.

The actual call stack was many lines long, but basically was a repetitive loop that looked like this:

0009750c 72a09a7b msvbvm60!BASIC_DISPINTERFACE_GetTypeInfo+0x2aa
0009754c 72a09c2c msvbvm60!EVENT_SINK_Invoke+0x50
0009757c 758c370d oleaut32!CFontEventsCP::Notify+0x9f
000975d4 7589c30e oleaut32!CFont::DiscardFont+0x5d
000975e8 758c41e5 oleaut32!CFont::put_Size+0x76
000975fc 729932c4 msvbvm60!IID_IVbaHost+0x24c84
00097630 72973db1 msvbvm60!IID_IVbaHost+0x5771
00097684 729c1e19 msvbvm60!IID_IVbaHost+0x537d9
000976c0 729acdb0 msvbvm60!IID_IVbaHost+0x3e770
000976fc 729ad0a1 msvbvm60!IID_IVbaHost+0x3ea61
00097730 72980eed msvbvm60!IID_IVbaHost+0x128ad
00097990 4fbadfdb ciaxplabel30!DllCanUnloadNow+0x10efd
00097a28 4fbaa41a ciaxplabel30!DllCanUnloadNow+0xd33c
00097a64 75873e75 oleaut32!DispCallFunc+0x165
00097a80 72a16ef5 msvbvm60!_vbaAptOffset+0x68b

You’ll note in there that the ciaxplabel30 control has raised it’s head again. To my mind this was enough evidence to remove the label controls of that type from my form and replace them with vanilla Visual Basic 6 text labels. That took me about 20 minutes, I ran my automated build script and transferred the new executable file to my helpful user’s computer. And ran the application. And it ran. AND IT DIDN’T CRASH. So, two years of frustration and fruitless work followed by half a morning of focused effort and I’d fixed up my problem.

Where I Went Wrong

My main failing in this whole sorry saga was not paying the bug the attention it deserved. I dithered and procrastinated with it, and it wasn’t until it was costing me real money that I became truly motivated to solve it. Don’t get me wrong, I’d spent time looking into it but it was rather half-hearted. Shame on me.

Why I Went Wrong

There’s two main reasons outside of my control that contributed to the time taken to solve this problem. First, I work in a rather isolated fashion with no other programmers that I can bounce ideas off of. Add that to the fact that my technical understanding of crash dumps and dump analysis borders on non-existent and you have a situation that isn’t going to result in quick fixes. To remedy this in the future I’ll resolve to make better use of online resources like StackOverflow. If I’d asked a question there I am sure someone would have pointed me to the right path in short order. The second contributing factor was my inability to replicate the issue on one of my own dev computers. If could have done that I would have solved the problem through trial and error. Ipso facto, removing all the controls from the form one at a time until the application stopped crashing and solving the problem by trial and error.

Where I Went Right

I didn’t do any of this very well. I guess I did bumble onto the solution in the end but it took a long time and I was heavily reliant on a generous user of my software to do so. Without that help I wonder now if I would have ever gotten to the bottom of it all. Part of me doubts it.

Where to from Here

There’s an important new tool in my debugging arsenal now, and the next time (and I’m sure there’ll be a next time) I know were to start with application crashes. If I get stuck I will make better use of online resources and forums. And I will not sit on these problems and hope they resolve themselves.

ADO and MySQLConcurrency violation: the UpdateCommand affected 0 of the expected 1 records

I am always <sarcasm>overjoyed to learn about some obscure bug that breaks my software</sarcasm> and I got to find a new one last week.  This one, a problem that involves ADO, the MySQL ODBC connector, and MySQL.  Basically, the problem boils down to FLOAT columns in MySQL not resolving to the same value to rounding errors.  These rounding errors only seem to occur on some CPU’s and presumably, it’s because of the different ways that floating point math are implemented on those CPU’s.  Basically the upshot of this is that when a FLOAT column of 6.0 is selected it might be selected as 6.0000000000001 once and 5.99999999999 a second time.

Normally this wouldn’t be that big of an issue but if you’re using .NET and DataSets it can cause a huge issue.  If a DataSet is opened, edited and then the results saved with something like this:

        public void saveDataSet(DataSet pDataSet)
        {
            this.openConn();
            _commandBuilder.GetUpdateCommand();     
            _adapter.Update(pDataSet);
            this.closeConn();
        }

It appears that upon calling the Update method that the original record is retrieved to make sure that the values have not changed between the DataSet being edited and the changes being committed. Now normally this isn’t an issue but if your dataset is retrieved from MySQL, and there’s a float column, and the rounding error I described above happens, then a concurrency exception is thrown. Which looks like this:

Concurrency violation: the UpdateCommand affected 0 of the expected 1 records. Source:System.Data

And that makes sense, because you don’t want to overwrite someone else’s database edits. But of course, this isn’t an edit, this is a rounding error. As Sod’s law would have it I couldn’t get this error to throw on any of my CPU’s without some sort of manual intervention. So given that I KNOW there cannot be concurrent edits of the same database row I’ve had to change the above code to the following:

        public void saveDataSet(DataSet pDataSet)
        {
            this.openConn();
            _commandBuilder.ConflictOption = ConflictOption.OverwriteChanges;
            _commandBuilder.GetUpdateCommand();   
            _adapter.Update(pDataSet);
            this.closeConn();
        }

Adding the ConflictOption simply ignores the concurrency exception and the problem goes away.

Microsoft Word Content Controls and VBA

I’ve been developing some “smart” forms a government department in the last few months. These forms had to be developed in good old MS Word. Now, Word is not really suited to creating tightly controlled forms, but, in my case it’s all I had to work with and I’ve had to work within the limitations presented to me. The only real solution available was to use Word Content Controls and then to protect portions of the document that users shouldn’t be able to edit. I’ve managed to get things working fairly well and thought it worth sharing a bit of code I’ve developed along the way that should help anyone working with Microsoft Word Content Controls and VBA.

Data Validation

If you’re doing forms then data validation is critical. It’s pretty straightforward if you’re working with content controls if you make use of the ContentControlOnExit event. For example, here’s a bit of basic validation that ensures the value entered into a field is currency:

Private Sub Document_ContentControlOnExit(ByVal CC As contentControl, Cancel As Boolean)
  Dim sngTotalCost As Single
  Dim oCC As contentControl
  Select Case CC.Tag
    Case "sTotalCost"
      If Not validateCurrency(CC.Range.Text) Then
        Cancel = True
        Beep
        CC.Range.Select
        Exit Sub
      Else
        CC.Range.Text = Format(parseCurrency(CC.Range.Text), "$#,###0.00")
      End If
  End Select
End Sub

Public Function validateCurrency(sValue As String) As Boolean
  Dim iLoop As Integer
  Dim bReturn As Boolean
  Dim iAsc As Integer
  
  On Error GoTo errorHandler
  
  bReturn = False
  
  validateCurrency = bReturn
  
  sValue = Trim(sValue)
  sValue = Replace(sValue, "$", "")
  sValue = Replace(sValue, ",", "")
  
  If Len(sValue) = 0 Then
    validateCurrency = True
    Exit Function
  End If
  
  For iLoop = 1 To Len(sValue)
    iAsc = Asc(Mid(sValue, iLoop))
    
    If iAsc = Asc(".") Or (iAsc >= Asc("0") And iAsc <= Asc("9")) Then
    
    Else
      Exit Function
    End If
  Next iLoop
  validateCurrency = True
  Exit Function
errorHandler:
  MsgBox "An error has occurred" & vbCrLf & "Module: ThisDocument" & vbCrLf & "Procedure: validateCurrency" & vbCrLf & "Error Number: " & Err.Number & vbCrLf & "Description: " & Err.Description, vbOKOnly
  Err.Clear
End Function

Public Function parseCurrency(sValue As String) As Single
  Dim iLoop As Integer
  Dim iAsc As Integer
  On Error GoTo errorHandler
  parseCurrency = 0
  
  sValue = Trim(sValue)
  sValue = Replace(sValue, "$", "")
  sValue = Replace(sValue, ",", "")
  
  If Len(sValue) = 0 Then
    parseCurrency = 0
    Exit Function
  End If
  
  For iLoop = 1 To Len(sValue)
    iAsc = Asc(Mid(sValue, iLoop))
    
    If iAsc = Asc(".") Or (iAsc >= Asc("0") And iAsc <= Asc("9")) Then
    
    Else
      Exit Function
    End If
  Next iLoop
  parseCurrency = Round(CSng(sValue), 2)
  Exit Function
errorHandler:
  MsgBox "An error has occurred" & vbCrLf & "Module: ThisDocument" & vbCrLf & "Procedure: parseCurrency" & vbCrLf & "Error Number: " & Err.Number & vbCrLf & "Description: " & Err.Description, vbOKOnly
  Err.Clear
End Function

In this code we simply check the tag of each content control as users move to the next one. Content control tags are set on the Developer tab from within Word. If the control has a tag we’re interested in then the value (Range.Text) is run through the ValidateCurrency function. If it is valid then the parseCurrency function is used to format the value correctly and write it back to the content control contents. If the value entered isn’t valid then a user alert is raised and the focus is returned to the content control

Excel Style “Automatic” Calculations

If you’ve got data validation sorted out it’s a simple step to have read only fields in your forms whose values are derived from user entered fields. This bit of code takes the value of a currency field, multiplies it by 1.1 and writes the value into a second field.

Private Sub Document_ContentControlOnExit(ByVal CC As contentControl, Cancel As Boolean)
  Dim sngTotalCost As Single
  Dim oCC As contentControl
  Select Case CC.Tag
    Case "sTotalCost"
      If Not validateCurrency(CC.Range.Text) Then
        Cancel = True
        Beep
        CC.Range.Select
        Exit Sub
      Else
        CC.Range.Text = Format(parseCurrency(CC.Range.Text), "$#,###0.00")
      End If
      Set oCC = ActiveDocument.SelectContentControlsByTag("sTotalCost").Item(1)
      sngTotalCost = parseCurrency(oCC.Range.Text)
      
      Set oCC = ActiveDocument.SelectContentControlsByTag("sTotalCostGST").Item(1)
      With oCC
        .LockContents = False
        .Range.Text = Format(sngTotalCost * 1.1, "$#,###0.00")
        .LockContents = True
      End With
  End Select
  Set oCC = Nothing

End Sub 

It’s pretty simple to see what’s happening here. The value in the content control with the tag sTotalCost is validated for currency, and if a correct value the number has a calculation applied to it and the resultant value is written to a second content control with the tag sTotalCostGST. Note that I use the LockContents method to be able to write to the second content control and then use it again to make it read only.

Changing Document Format Based on Content Control Value

The last thing I’ll share is using the value in a content control to change some format in a Word document. In this case I simply set the font color of the content control based on the value selected in the control

Private Sub Document_ContentControlOnExit(ByVal CC As contentControl, Cancel As Boolean)
  Dim sngTotalCost As Single
  Dim oCC As contentControl
  Select Case CC.Tag
    Case "sTag1", "sTag2", "sTag3"
      If CC.Range.Text = "Yes" Then
        CC.Range.Font.ColorIndex = wdGreen
      End If
      If CC.Range.Text = "No" Then
        CC.Range.Font.ColorIndex = wdRed
      End If
  End Select
  Set oCC = Nothing
End Sub

These content controls were of the dropdown list type. When “Yes” is selected the font color is set to green with the ColorIndex property. When set to “No” the Font.ColorIndex is set to Red. Pretty simple.