Category Archives: web servers

Last updated by at .

Random Notes for Setting up a New Ubuntu LAMP Server on Linode

This is the first entry written on the new home of this blog, a 1GB Linode server. I moved it here from a Pair account that I am in the process of closing. The server is running Ubuntu Server 16.04 LTS, Apache, MySQL, and PHP 7.

Using /srv/www as Web Root

It looks like Apache defaults to using /var/www as the web root. I prefer using /srv/www. To enable this open up /etc/apache2/apache.conf, comment out the section and uncomment the section. Make sure to change the AllowOverride directive to All or .htaccess and mod_rewrite won’t work.

Getting mod_rewrite to Work

You need to make sure that the AllowOverride directive is setup as per above. Then just enable the mod with a2enmod rewrite.

Installing PHP7

PHP7 is installed fairly easily with sudo apt-get install php7.0 php7.0-fpm php7.0-mysql.

Permissions for WordPress

When first installing WordPress make sure to

sudo chown -R www-data:www-data /srv/site-root/

After installation set permissions on folders and files using:

find . -type d -exec chmod 775 {} \;
find . -type f -exec chmod 644 {} \;

Note that 775 is used because we need www-data and a ftp user to be able to modify the WordPress install.

Then take ownership of the whole folder again with:

sudo chown -R ftp-user:ftp-user /srv/site-root/

And give ownership of wp-content to Apache with:

chown -R www-data:www-data /srv/site-root/wp-content

And secure wp-config.php with:

chmod 600 /srv/site-root/wp-config.php

Setting up a MySQL Database and User

It like to have a user for each WordPress install rather than using some sort of global user. It’s done fairly easily with:

create database database_name;
create user user_name@’localhost’ identified by ‘somepassword’;
grant all privileges on database_name.* to user_name@’%’ identified by ‘somepassword’;
grant all privileges on database_name.* to user_name@localhost identified by ‘somepassword’;
flush privileges;

Zipping a WordPress Install

Moving a WordPress install from Pair to Linode involved zipping up the install folder, transferring it via SFTP to the new server, and unzipping it. This is done with:

tar -zcvf somesitename.tar.gz somesitename/

And extracting with:

tar -xvzf somesitename.tar.gz

The extraction will create the folder to put the contents in.

Basic Process of Moving Site

  1. Zip up WordPress install folder.
  2. Dump database using MySQL Dump or phpMySQL. Remember to add use database_name; to start of MySQL Dump file.
  3. Transfer install folder and MySQL dump to new server using SFTP.
  4. Create new database and user. Import data to database using something like mysql -uroot -ppassword < mysql_dump.sql
  5. Unzip WordPress tar.gz file to /srv.
  6. Edit the /srv/domain_name/wp-config.php file to enter new database details and login.
  7. Create new /srv/domain_name-logs/ folder for Apache logs and set www-data as the owner.
  8. Set permissions on WordPress folders as covered earlier.
  9. Make entry into /etc/hosts file for 127.0.0.1 site_name.
  10. Create /etc/apache2/sites-available/site_name.com.conf file making sure to set the web root and log file path correctly.
  11. Enable the site with a2ensite site_name.com.conf.
  12. Test by setting your local machine’s hosts file for the domain to the server IP address.
  13. Setup the new DNS Zone on Linode for the site.
  14. Adjust the Name Servers at the domain registrar for the domain.
  15. Wait for the DNS records to propagate!

How Not to Mess Up a Multi Domain SSL Renewal

I’ve just finished a few hours of fun messing up a multi domain SSL certificate renewal. In the first draft of this entry I did not use the word mess, messing, or messery. I used another four letter word, but since then I’ve settled a bit and have come back and edited out the profanity. I managed to un-mess it today so in the interests of not performing the same messery at some point in the future here’s what I need to do next time.

  1. The Namecheap Multi-Domain PositiveSSL certificate requires you to have a certificate for the non-www and the www versions of a domain. In fact, it requires you to have one for each sub-domain of a parent domain you want to secure.
  2. If renewing the SSL certificate then you should generate a new CSR file. Make extra sure to use the non www version of the domain as the primary domain.
  3. Using the Namecheap HTTP DCV validation method is dead simple but make sure to read the instructions carefully as they can (and have) changed the folder they want the validation file uploaded to. It was just the root folder but just a few weeks later they wanted it in the ./well-known/pki-validation/ folder. What the?!

When a new certificate is issued make sure to upload the crt and ca-bundle file to the /etc/apache2/some-folder-name-date/ folder to keep it apart from your old certificate files. Don’t forget to put the server .key and .csr file there and then protect the lot with chmod 400

Using the Apache VirtualHost system requires the following sort of entry for a site:

<VirtualHost *:80>
    ServerAdmin admin@domain.com
    ServerName www.domain.com
    ServerAlias domain.com *.domain.com
    DocumentRoot /srv/www/public_html/
    Redirect permanent / https://www.domain.com
</VirtualHost>

<VirtualHost  *:443>
    SSLEngine On
    SSLCertificateFile /etc/apache2/ssl/domain-com-august-2017/some_file.crt
    SSLCertificateKeyFile /etc/apache2/ssl/domain-com-august-2017/server.key
    SSLCertificateChainFile /etc/apache2/ssl/domain-com-august-2017/some_file.ca-bundle
    ServerName www.domain.com
    ServerAdmin admin@domain.com
    ServerAlias domain.com *.domain.com
    DocumentRoot /srv/www/public_html/
    ErrorLog /srv/www/domain-logs/error.log
    CustomLog /srv/www/domain-logs/access.log combined
    AddHandler cgi-script .cgi .pl
</VirtualHost>

Now, I am not 100% sure if the ServerName/ServerAdmin/ServerAlias/DocumentRoot entries need to be duplicated. But until this point it’s never broken anything so no harm done. The key point of this is that because the SSL handshake is the very first thing that happens between a client the web-server you absolutely 100% need a SSL certicate for the www subdomain as well as the main domain. There’s no getting around it with redirects in .htaccess or any other such trickery.

Allowing ‘0000-00-00’ as Default Value for MySQL datetime Column

It can be useful to allow the default value of a MySQL date / datetime column to be set to zero, it makes checking if it’s initialised simple and saves you having to deal with pesky null values. It also allows you to set the column as NOT NULL. However, from version 5.6 onwards MySQL has STRICT_MODE for queries turned on, as well NO_ZERO_IN_DATE mode turned on. If you try to create new column with something like:

`some_field` datetime DEFAULT ‘0000-00-00 00:00:00’

You’ll see this error:

Invalid default value for ‘some_field’

This is pesky if you’ve got code written for earlier versions of MySQL and you don’t want to go back and re-write it all to check for NULL instead of zero. Turning these things off is pretty simple. On Ubuntu I created a file in /etc/mysql/conf.d/ called disable_strict_mode.cnf. The file contents are shown below:

[mysqld]
sql_mode=IGNORE_SPACE,ERROR_FOR_DIVISION_BY_ZERO,NO_AUTO_CREATE_USER,NO_ENGINE_SUBSTITUTION

Then restart MySQL with sudo service mysql restart and you’ll be able to create date and datetime fields with a zero default value.

PERL Search and Replace in Multiple Files – Easy as PIE

I help to administer a blog with about 2000 entries.  Previously the site was managed in MovableType but earlier this year we moved it over to WordPress.  At the time we migrated about 30% of the posts to WordPress (the top trafficked 30%).  It was a slow process and as time has gone by we’ve migrated more and more posts  but it’s a time consuming process.  We need to create the new WordPress post, put a 301 redirect in place and then manually delete the old MovableType post.  And by manual deletion I mean deleting the actual HTML file that MoveableType created for that post.  You see, MovableType produces static files for each and every post, archive page, and index page.  This is a blessing and a curse, it means that the load on the web server isn’t large on heavily trafficked sites, but it also means maintaining a legacy site is a PAIN IN THE A**.  It’s actually such a pain that I have given up with MT itself and now I am working with the static HTML files directly.

This week I needed an easy way of doing a search and replace in all the legacy HTML files, all 2000 or so of them.  It needed to be recursive and ideally it needed to happen without me needing to FTP all the files to a local computer and then FTP them back.  I have command line access to the server the blog is on so I checked to see if PERL offered a way to do what I wanted working on the files in situ.  As it turns out it’s pretty simple.  I wanted to find and replace all internal links that used the old domain name (did I mention this site just changed domain names) with the new domain name.  The PERL command to do this with all the files in a single folder is like this:

perl -p -i -e 's/oldstring/newstring/g;' *.html

The -p means the script we’re running will be put through the C pre-processor before PERL compilation. The -i option means that PERL will edit the files in place. The -e option allows the running of PERL commands from the command line (it doesn’t look for a script file). The actual PERL operator s is the substitution operator while the he oldstring and newstring are regular expressions so special characters need to be escaped appropriately. And finally the operator /g means the command will do a global match. So to replace my URLs I needed something like this:

perl -p -i -e 's/www\.old\-domain\.com/www\.new\-domain\.com/g' *.html

The issue with that is that I needed the script to process sub-directories recursively to search and replace in all the HTML files. That could be done in a few different ways, the immediately obvious were chaining with FIND or GREP. I chose FIND and ended up with a command that looks like this:

perl -p -i -e 's/www\.old\-domain\.com/www\.new\-domain\.com/g' ' `find ./ -name "*.html"`

Ran that from the ubuntu commmand line and thousand or more files were processed in under a second. Very cool.

Preloading Images with CSS

Here’s a helpful snippet that will preload images with CSS. Stops that annoying lag when using CSS to switch images and the image isn’t pre-loaded.

body:after {
	display: none;
	content: url("filename1.png") url("filename2.png");
}

Renewing my Namecheap SSL Certificate on Linode Apache2 Web Server

This post is something of a reminder to myself. How to renew a NameCheap Comodo SSL certificate on one of my Linode Apache2 web-servers. It’s something I only have to do every few years so I essentially have to re-learn the process every time which is rather tiring. This post will be here for my future self to make the process easier.

1. Renew the SSL Certificate on NameCheap

I use NameCheap for all my domain name registrations and SSL certificates. They have many different types of SSL certificates available from several different providers ranging from simple domain certificates right up to full wildcard organization based certificates. The great thing about any of them is that NameCheap will email you well in advance of them expiring. When they do so it’s simply a matter of logging into your NameCheap control panel and renewing the certificate. A new entry will be created with the status of “Waiting Activation”.

2. Create the CSR File

My host runs apache2 on Ubuntu and OpenSSL. Apache looks for certificates in /etc/apache2/ssl and I usually create a sub-folder for new CSR and key files when the old ones expire. I feel its a bit more secure to generate a new Certificate Signing Request (CSR) whenever a certificate expires, which is why I do this. So I create a folder for the files:

cd /etc/apache2/ssl
mkdir december-2014
cd december-2014

Then create a CSR file using:

openssl req -newkey rsa:2048 -days 1095 -nodes -keyout www.my-domain.com.key -out www.my-domain.com.csr

The openssl req command will then ask for some information to encode with the request. That looks something like below. Make sure when entering the FQDN that you enter the bare domain (ie no www).

You are about to be asked to enter information that will be incorporated
into your certificate request.
What you are about to enter is what is called a Distinguished Name or a DN.
There are quite a few fields but you can leave some blank
For some fields there will be a default value,
If you enter '.', the field will be left blank.
-----
Country Name (2 letter code) [AU]:AU
State or Province Name (full name) [Some-State]:South Australia
Locality Name (eg, city) []:Adelaide
Organization Name (eg, company) [Internet Widgits Pty Ltd]:My Company Name
Organizational Unit Name (eg, section) []:
Common Name (eg, YOUR name) []:mydomain.com
Email Address []:admin@mydomain.com

Please enter the following 'extra' attributes
to be sent with your certificate request
A challenge password []:
An optional company name []:My Company Name

This will create the CSR file (www.mydomain.com.csr) and a SSL certificate key file (www.mydomain.com.key). The key needs to be protected with:

chmod 400 www.mydomain.com.key

3. Issue the SSL Certificate via NameCheap

The contents of the CSR file are needed to issue the SSL certificate via the NameCheap control panel. View the contents with:

more www.mydomain.com.csr

The contents will look something like this:

-----BEGIN CERTIFICATE REQUEST-----
123DQDCCAigCAQAwgbAxCzAJBgNVBAYTAkFVMRgwFgYDVQQIEw9Tb3V0aCBBdXN0
cmFsaWExETAPBgNVBAcTCEFkZWxhaWRlMSAwHgYDVQQKExdUaW1lc2hlZXRzIE1U
UyBTb2Z0d2FyZTEkMCIGA1UEAxMbd3d3LnRpbWVjbG9ja210cy1vbmxpbmUuY29t
MSwwKgYJKoZIhvcNAQkBFh1hZG1pbkB0aW1lY2xvY2ttdHMtb25saW5lLmNvbTCC
ASIwDQYJKoZIhvcNAQEBBQADggEPADCCAQoCggEBAOeLw456FYT+reZ8VH2PFD6B
pxk4NGHczMeAajXVabF/O+KBTqveBeqCEoXQzPO7Z4rovVdNJp5z06t54mOmILue
pENONp7mmfLMaPrvPrunOzdCo1ltoegNhQh+SYK0gY2SoMA69hEm2jgDL9umBueY
7kSCa/p0p7znZWCxt1yFf/5VhKVgXgh0C+6PD9VJp4nEBYcVSwOlbuHi1gsCFmwb
DXOpU6vAK61Ot43AaOdWGN8Aao9GqvMPDyV1hW0GcH/WCyAD19u5YUSz2jZP9qnc
MP1IhDD2smz24qkdZD8/LwPusEnAILL8HVp3z5v+4FMAVHWWNGj6X+ZgNQYPlFUC
AwEAAaBKMCAGCSqGSIb3DQEJBzETExFzb2dneWhvcnNlYmlzY3VpdDAmBgkqhkiG
9w0BCQIxGRMXVGltZXNoZWV0cyB789MgU29mdHdhcmUwDQYJKoZIhvcNAQEFBQAD
ggEBAIj4cddghuRyEGcJvSzsdarfaIHIUHUUN9kc9udsqS0pNcnk0s4xBMz2E72R
0ArwP43QBAiA8x8aganbqcj5WB+bDhasTDCBlOomeplQJ4LsYwdd2geMTxrxsoaq
VXc5TaS9Ct+vGqDIg+tQmd8PbGk2m3zzGFeacGn42xnRGBxe21eSmkMo4yPF7KZl
h/M5l6kZFhejSSM+jyvXqMaRjX4gtQxloXisUxiyxO2mSA5gc0p4/tJ+oC1Dj3mw
rE3EYcoOi1XkAcuflLhp/YN4COd/TkH5DwwKCMJOvmuWdqurxjXIqlxlBchqb9Ml
SXCA5yk12345678wOayT2/kQJG0=
-----END CERTIFICATE REQUEST-----

Copy the contents to the clipboard and go to your NameCheap control panel and select the SSL certificate to activate. Select the correct server configuration (in this case Apache2 + OpenSSL) and paste the contents of the CSR file into the CSR Text field and submit the activate request. NameCheap will then ask for an email address to confirm the issuing of the SSL certificate for the domain. Confirm the request and next you’ll have to confirm that you actually own the domain. Namecheap offers three alternatives for this, file validation, DNS validation and email validation.

File Validation

File validation involves downloading a file from Namecheap and uploading it to the /.well-known/pki-validation folder of your website. You must make sure that the file is accessible from both the naked and www addresses of your website for this validation to complete properly. This means disabling any non-www to www redirects. This is OK if you’re not running WordPress, but if you are running WordPress this can be difficult. If you are running WordPress I’d suggest using Domain or Email validation.

DNS Validation

DNS validation involves creating a CNAME DNS entry for the domain you want to validate. The CNAME entry is available from Namecheap. This is the best approach for WordPress websites if you do not have emails available.

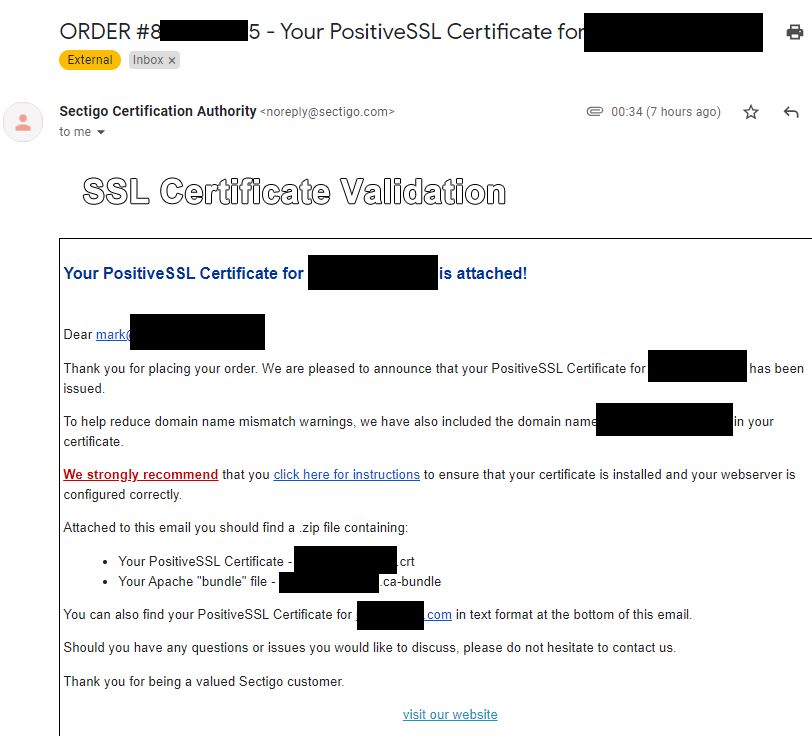
4. Confirm the SSL Certificate Issue

The SSL certificate I renewed was a Comodo certificate and after a few seconds I got an email from Comodo asking me to confirm the issuing of a certificate. The email looked like this:

Comodo Confirm Issue SSL Certificate Email

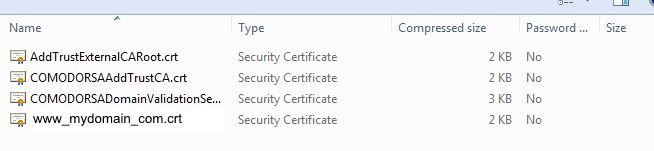
It’s simply a matter of clicking on the confirmation link in that email and pasting the “validation code” into a text box on the resultant web page. Once you’ve done that another email will arrive in a few minutes with a ZIP file attached. The zip file contains the following files:

Comodo SSL Files

Comodo SSL Files

The AddTrustExternalCARoot.crt is the CA (certificate authority) root certificate which identifies the company we’ve paid to issue the SSL certificate. In this case, Comodo via NameCheap. You’ll need that file. You’ll also need the www_mydomain_com.crt file which is the signed CSR.

5. Install and Protect Certificate File

Both files mentioned above need to be copied to the folder we created in step 1, namely:

/etc/apache2/ssl/december-2014/

Once there protect the signed crt file with:

chmod 400 www_mydomain_com.crt

6. Configure Apache to use New SSL Certificate

The last step in the process is to configure Apache to use the new SSL Certificate. Open up the site configuration file with:

nano /etc/apache2/sites-available/site-name.conf

In my case I looked for the SSL VirtualHost section of the file which looked like this:

<VirtualHost  222.222.222.222:443>
    SSLEngine On
    SSLCertificateFile /etc/apache2/ssl/december-2011/www.mydomain_com.crt
    SSLCertificateKeyFile /etc/apache2/ssl/december-2011/www.mydomain.com.key
    SSLCertificateChainFile /etc/apache2/ssl/december-2011/www.mydomain.com.ca-bundle
    ServerName www.mydomain.com
    ServerAdmin general@mydomain.com
    ServerAlias mydomain.com
    DocumentRoot /srv/www/public_html/
    ErrorLog /srv/www/logs/error.log
    CustomLog /srv/www/logs/access.log combined
    AddHandler cgi-script .cgi .pl
</VirtualHost>

You can see that the SSLCertificateFile SSLCertificateKeyFile and SSLCACertificateFile directives need to be changed to use the new certificate files. I modified them to look like this:

<VirtualHost  222.222.222.222:443>
    SSLCertificateFile /etc/apache2/ssl/december-2014/www_mydomain_com.crt
    SSLCertificateKeyFile /etc/apache2/ssl/december-2014/www.mydomain.com.key
    SSLCertificateChainFile /etc/apache2/ssl/december-2014/www.mydomain.com.ca-bundle

Saved the file, exited Nano and then reloaded Apache with:

service apache2 reload

8. Verify New Certificate is Installed

If you’ve done everything correctly it’s a simple matter of checking if the certificate is installed correctly. I did it by navigating to the website in Google Chrome and clicking on the https padlock icon and viewing the certificate information. It looked like the image below and you should see that the expiry date has updated correctly. Job done.

Success - SSL Certificate Installed

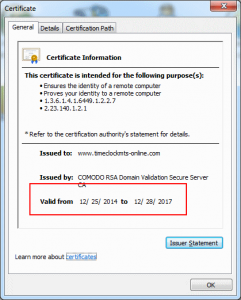
Success – SSL Certificate Installed

Bash Shell Vulnerability Found – Patching Ubuntu

The interwebz is abuzz with the latest vulnerability for *nix based systems that us the BASH shell. The so-called Shell Shock exploit allows devious users to run commands against your system using a bug in the way BASH handles environment variables. Ouch. To check if your system is vulnerable run the following in a shell:

env x='() { :;}; echo vulnerable’ bash -c “echo this is a test”

If your system is vulnerable you’re going to see this:

vulnerable
 this is a test

If your system is not vulnerable you’re going to see something like this:

bash: warning: x: ignoring function definition attempt
bash: error importing function definition for `x'
this is a test

There’s a patch available for Ubuntu systems already. All I did was this:

sudo apt-get update
sudo apt-get install bash

And hey presto the system is no longer vulnerable.

How I Reload my iptables Rules on Ubuntu Reboot

There’s a few ways that custom iptables rules can be re-loaded when your Ubuntu server reboots. I’ve chosen to reload mine using the /etc/network/interfaces file. Here’s what I’ve included in that file:

auto lo
iface lo inet loopback
pre-up iptables-restore < /etc/iptables.firewall.rules
auto eth0
iface eth0 inet dhcp

The key line here is the line starting with pre-up. This directs the iptables-restore to reload my rules from the /etc/iptables.firewall.rules file.

Another way of accomplishing the same thing is to create a script file in the /etc/network/if-pre-up.d/ directory and put the following in it:

#!/bin/sh
/sbin/iptables-restore < /etc/iptables.firewall.rules

Then set the permissions on the script file with:

sudo chmod +x /etc/network/if-pre-up.d/your-filename

Setting up Apache Permissions for www-data and an FTP User

A problem I have when setting up a website on a new server (or a new site on an existing server) is sorting out permissions for the Apache user (www-data) and an FTP user. I can never quite remember how to set things up so that I am not continually needing to log into a console to adjust permissions so I can FTP some files to the server. This post is the definitive reminder to myself showing how it should be done. This example applies to Ubuntu but I guess it is equally applicable to other flavours of Linux.

Add the FTP User to the www-data Group

First thing we want to do is add the FTP user (you have created an FTP user haven’t you?) to the www-data usergroup. www-data is the user/group used by Apache.

sudo adduser ftp-username www-data

Change Ownership of Files

The next step is to set the www-data group as the owner of all files and directories in the HTML source directory.

sudo chown -R www-data:www-data /var/www

Grant Group Permissions

Now we want to add write permission for the www-data group for all the files and directories in the HTML source directory.

sudo chmod -R g+w /var/www

Add umask for New Files

The final step is to make a change to an Apache configuration file so that the umask for new files created by Apache is such that the www-data group has write permissions on them. Open /etc/apache2/envvars in your text editor of choice and add this to the bottom of the file:

umask 007

The three octal digits for umask are for the Owner/Group/Others. The 0 leaves permissions unmasked (ie left at read/write/execute) and 7 gives no permissions at all. This would be equivalent to chmod 770. There’s a useful chart here showing the relationship between the binary rwx permissions and the octal numbers used by chmod and umask.

Credit for this must go to the top voted answer to this question on askubuntu.com.

Checking if Someone is Logged into MyBB

I run a little web forum that uses MyBB. I’ve been building some tools for members of the forum to use and thought it would be good to restrict access to those tools to logged in forum members. Turns out this was VERY easy to do. MyBB drops a cookie for logged in users called mybbuser. This cookie contains data in this form:

uid_loginkey

uid and loginkey are columns from the MyBB users table. So, checking if someone is logged into MyBB is simply a matter of checking for the existence of the mybbuser cookie which can then be exploded to select the users details from the MyBB table. Here’s some code I knocked up in PHP to select the MyBB username if the user is logged into my forum.

<?php 
	if (isset($_COOKIE['mybbuser']))
	{
		
		$user_details=$_COOKIE['mybbuser'];
		$user_details=explode("_",$user_details);
		
		$database="database_name";
		$server="localhost";
		$user="mysql_user";
		$password="password";
		$table_prefix="mybb_";
		
  	        $link_id = mysql_connect($server,$user,$password);
         	@mysql_select_db ($database);	
		
		$username='';
		
		$result=mysql_query("select * FROM ".$table_prefix."users where uid=".$user_details[0]." and loginkey='".$user_details[1]."'");
		if ($result)
		{
	  	if (mysql_num_rows($result)>0)
	  	{	
		  	$row=mysql_fetch_assoc($result);
				$username=$row['username'];
			}
		}

	}
	
?>

You can now use that username anywhere in the web page. Or use it as a conditional check to display certain content to logged in MySQL users and different content to non logged in users.