Category Archives: linux

How I Reload my iptables Rules on Ubuntu Reboot

There’s a few ways that custom iptables rules can be re-loaded when your Ubuntu server reboots. I’ve chosen to reload mine using the /etc/network/interfaces file. Here’s what I’ve included in that file:

auto lo
iface lo inet loopback
pre-up iptables-restore < /etc/iptables.firewall.rules
auto eth0
iface eth0 inet dhcp

The key line here is the line starting with pre-up. This directs the iptables-restore to reload my rules from the /etc/iptables.firewall.rules file.

Another way of accomplishing the same thing is to create a script file in the /etc/network/if-pre-up.d/ directory and put the following in it:

#!/bin/sh
/sbin/iptables-restore < /etc/iptables.firewall.rules

Then set the permissions on the script file with:

sudo chmod +x /etc/network/if-pre-up.d/your-filename

Setting up Apache Permissions for www-data and an FTP User

A problem I have when setting up a website on a new server (or a new site on an existing server) is sorting out permissions for the Apache user (www-data) and an FTP user. I can never quite remember how to set things up so that I am not continually needing to log into a console to adjust permissions so I can FTP some files to the server. This post is the definitive reminder to myself showing how it should be done. This example applies to Ubuntu but I guess it is equally applicable to other flavours of Linux.

Add the FTP User to the www-data Group

First thing we want to do is add the FTP user (you have created an FTP user haven’t you?) to the www-data usergroup. www-data is the user/group used by Apache.

sudo adduser ftp-username www-data

Change Ownership of Files

The next step is to set the www-data group as the owner of all files and directories in the HTML source directory.

sudo chown -R www-data:www-data /var/www

Grant Group Permissions

Now we want to add write permission for the www-data group for all the files and directories in the HTML source directory.

sudo chmod -R g+w /var/www

Add umask for New Files

The final step is to make a change to an Apache configuration file so that the umask for new files created by Apache is such that the www-data group has write permissions on them. Open /etc/apache2/envvars in your text editor of choice and add this to the bottom of the file:

umask 007

The three octal digits for umask are for the Owner/Group/Others. The 0 leaves permissions unmasked (ie left at read/write/execute) and 7 gives no permissions at all. This would be equivalent to chmod 770. There’s a useful chart here showing the relationship between the binary rwx permissions and the octal numbers used by chmod and umask.

Credit for this must go to the top voted answer to this question on askubuntu.com.

Installing Munin on a Linode Node

I’ve followed this guide for installing Munin on my nodes at Linode a few times now. Munin is a remote server monitoring tool that allows you to monitor all sort of things about the health of your servers. Servers you want to monitor are “munin-nodes” and the server where you view all of the reports from is the “munin-master”. It all makes sense but the Linode installation guide fails horrifically if your apache webroot is not the default /var/www that Munin expects it to be. So as a reminder to myself, here’s how I got Munin working on a server where the web root was /srv/www.

First, follow the install guide exactly as instructed by the good folk at Linode. Then modify /etc/munin/apache.conf to remove references to /var/www and change them to your web root of choice. My file looks something like this:

Alias /munin /srv/www/munin
<Directory /srv/www/munin>
                Options Indexes FollowSymLinks MultiViews
                AllowOverride all
                Order allow,deny
                allow from all
    <IfModule mod_expires.c>
        ExpiresActive On
        ExpiresDefault M310
    </IfModule>
</Directory>

Then I restarted Munin with:

sudo /etc/init.d/munin-node restart

I happen to use my munin-master as a dumb web host so the pretty Munin web pages are just in a folder off of the web root. You could be tricky and put them on their own sub-domain but I’ve chosen not to do that. So they live in a sub-folder and I can access them using this address:

http://www.your-site.com/munin/

And when I did I was seeing a 403 forbidden error. And when I took at look at the apache error log saw an entry like this:

[Mon Feb 03 04:09:23 2014] [error] [client 123.123.123.123] client denied by server configuration: /var/cache/munin/

Clearly Munin is still trying to access a folder outside of my webroot. So then it was a matter of adding this new section to my /etc/apache2/sites-available/default file:

        <Directory /var/cache/munin/www/>
                Options Indexes FollowSymLinks MultiViews
                AllowOverride None
                Order allow,deny
                allow from all
        </Directory>

Then restarting apache with

sudo /etc/init.d/apache2  restart

Now if I visited the Munin pages using the same address as above I can see pretty graphs telling me all about my servers! w00t!

Installing the PHP MCRYPT Extension on Ubuntu

I use the PHP mycrypt extension to generate some encrypted URLs for one of my online applications. I had reason to test some of this functionality on my local development web server recently and the following error was thrown by PHP:

Call to undefined function mcrypt_create_iv()

Turns out that I didn’t actually have the MCRYPT extension installed on my little Ubuntu web server. Doing so was simply a matter of typing this at a command prompt:

sudo apt-get install php5-mcrypt

And that’s it. No need to re-start Apache or anything else. Groovy.

Help Brian Buy New Computers

Brian Lunduke has a cool blog that I read. He’s a Linux advocate, sometimes tech journalist, and writer of children’s and comic books. And sadly someone just robbed him and stole all of his computers. Rather than appeal for cash to get new ones he’s encouraging people to spread the word about his books (which can be bought here) in the hope of selling enough to pay for new computers. As a prize he’s going to randomly choose someone who helps spread the word to become a character in his next book entitled “Steve’s Laptop”. Now I don’t particularly care about winning anything but I would like a copy of “Linux is Badass” so I’m hoping that one of my readers will pony up the $2 to buy it for me. I’d do it myself but I am cheap.

Uploading to a Production Server with RSYNC

I knew you could use RSYNC to synchronize a local copy of a website with the files on your production server. In fact I’ve known it for long enough to have tried to get it working a few years ago but failed miserably. Well I’ve learned a bit since then (well I like to think so anyway) so I thought I’d give it another go this this morning. And, it was surprisingly easy. In this guide I refer to my local server (a teeny tiny Ubuntu server) as the LOCAL SERVER and the remote production server as the REMOTE SERVER.

Install SSH Key on Remote Server

Firstly I needed to install a SSH key on my REMOTE SERVER so my LOCAL SERVER could log into it without me needing to enter a password every time I wanted to synchronize the files. This is easy enough, on the LOCAL SERVER enter the following:

sudo ssh-keygen

Enter the default values as prompted and this will create a public key in ~/.ssh/ called id_rsa.pub. This file needs to be set to the remote server. This is done easily with:

scp ~/.ssh/id_rsa.pub user@remote_server.com:/home/user/uploaded_key.pub

Then this file needs to be appended to the authorized_keys file on the REMOTE SERVER with:

ssh user@remote_server.com "echo `cat ~/.ssh/uploaded_key.pub` >> ~/.ssh/authorized_keys"

Construct RSYNC Included and Excluded Files / Folders List

If you’re like me your development folders are littered with test files and directories that you don’t want on your production servers. So you’re going to need to create inclusion and exclusion lists for RSYNC to use so it knows what to upload and what not to upload. This is simply done using text files with file / folder specifications on separate lines. For example my include.txt looks something like this:

app
classes
create-scripts
cron-scripts
css
inc
js
images
tooltips
validation_scripts

While my exclude looks something like this:

/app/jscal
/css/img/Thumbs.db
/create-scripts/*.txt
app/test-first-day-of-week.htm
app/test-mcrypt.htm
app/images/Thumbs.db

These files can be written in nano and saved somewhere sensible (probably where you’re going to put your rsync bash script).

Write your BASH script

Next step is to write a very short bash script that includes your RSYNC command. My script looks like this:

#!/bin/bash
rsync  -v -u -r -a --rsh=ssh --stats --progress --files-from=include.txt --exclude-from exclude.txt /srv/windows-share/local-source-files/   user@remote-server:/srv/www/remote-source-files/

Don’t forget you need to make your script executable with something like:

sudo chmod 700 rsync_upload.bsh

Also you’re going to want to test the RSYNC command using the -n (or –dry-run) option to make sure everything works the way you expect it to. You’ll also need to specify the -r (recursive) option because the –files-from directive overrides the implied recursion you get from the -a (archive) option.

Run your Script

So now when you’re done developing and testing files on your development server it’s simply a matter of running your new script to sync the files on your production server. Something like the following will run your script:

sudo /path/to/script/rsync_upload.bsh

Serving up Different Websites on My Local Network

I manage a number of different websites and most of the development has been done offline on a Windows 7 machine. I use the LAMP stack for all my sites and have always found the easiest method of setting up an equivalent WAMP stack on a Windows 7 machine was using XAMPP by Apache Friends. This has always worked fine but was a bit clunky when I wanted to change which website I was working on. It meant killing the Apache processes (httpd.exe) in the Windows task manager, editing the Apache conf file to change which site I was working on and then re-starting Apache. And when crap programs like Skype keep grabbing port 80 restarting Apache is always a pain in the butt.

There had to be an easier way so this week I took an hour out of my day to work out what it was. I already had Apache installed on my mini file server that runs Ubuntu so it was just a matter of getting that to work properly to serve up different sites. And that was (surprisingly) simple.

Edit the Hosts File on the Server

First step was to edit the hosts file on the linux machine with

sudo nano /etc/hosts

And then add entries for the sites I wanted to be served up locally. So, my hosts file ended up looking something like this:

127.0.0.1       localhost
127.0.0.1       local-site-1
127.0.0.1       local-site-2

Create Sites Available Files

I then had to create files for each site to sit in Apache’s sites available directory (/etc/apache2/sites-available/)

These files are pretty simple and in my case looked like this:

<VirtualHost *:80>
    ServerName local-site-1
    DocumentRoot "/srv/path/to/local/site/1/html_root/"
</VirtualHost>

Just change the server name to your local site name and the DocumentRoot to the path where the files for the site reside. In my case DocumentRoot is a SAMBA directory that is accessible from my windows machines (so I can edit the files from my dev machines). Name each file sensibly (in my case I named them local-site-1 and local-site-2).

Enable Sites and Reload Apache

Enabling the new sites is simple, just use the following command:

sudo a2ensite /etc/apache2/sites-available/local-site-1

Then reload the apache configuration with:

sudo /etc/init.d/apache2 reload

Edit the Windows Hosts File

The final step is to edit the hosts file on the Windows machines you want to access the local sites. On Windows 7 this can be found in:

%systemroot%\system32\drivers\etc\

I opened this in Notepad and changed it to look like this:

127.0.0.1 localhost
192.168.2.3 local-site-1
192.168.2.3 local-site-2

Note that 192.168.2.3 is the IP address of my file server.

Now if I want to access one of these local sites in a browser I just need to type local-site-1 into the address bar and hey presto I see the local copy of the website served up by my file server. I love increased productivity!

Potential Improvement

One potential improvement to this process is to remove the need to edit Windows hosts files by installing a DNS server (like dmasq) that will resolve the local site URL’s into an IP address. Of course this would require changing the DNS settings on the Windows machines.

Turning Your Headless Linux Machine into a DLNA Media Server

We have had a Sony Bravia KDL40HX750 TV for a while now. It’s a great TV and can stream media from a compliant DLNA media server. I was doing this with Windows Media Player from my dev PC but given that my dev machine is usually turned off after 9PM it wasn’t used much. So, given that my My mini-ITX file server had been running nicely for a week or so I figured it could become the new media server for the house. Here’s how I got it working.

1. Mount an External HDD

The first problem was to mount an external USB disk drive to hold the media. And I wanted it to mount to the same point every time it was unplugged and plugged back in. This was fairly simple. Firstly, we need to work out the UUID of the USB drive we want to use. Run:

sudo blkid

And you should see something like that shown below. Our USB drive is on the bottom line,

/dev/md1: UUID="a20f7307-fb20-4c92-95d2-db222778af8f" TYPE="swap"
/dev/md0: UUID="c4c0ea5f-0613-4acc-8fa5-4d5968802771" TYPE="ext4"
/dev/sdc1: UUID="AE884FDE884FA425" TYPE="ntfs"

Once you know the UUID open up /etc/fstab in your text editor of choice and add an entry that looks something like this:

UUID=AE884FDE884FA425 /media/mediadrive ntfs defaults 0 0

Save those changes. Then create a mount point for your mediadrive using something like:

sudo mkdir /media/mediadrive/

Then reboot your machine and you should find that fstab mounts your USB drive to /media/mediadrive

2. Install and configure minidlna

There’s a number of DLNA compliant media servers for Linux. I chose minidlna because it was small and seemed to just work. Install it with:

sudo apt-get install minidlna

Then open the minidlna.conf file with:

sudo nano /etc/minidlna.conf

And configure to suit. I left most settings as is but you’ll need to set the path to your media drive, the network interface, and give your media server a name for devices to use when they connect to it. Here’s what those settings look like:

media_dir=/media/mediadrive
network_interface=p4p1
listening_ip=192.168.2.3
friendly_name=EinsteinJR

I note that there’s a web interface to manage minidlna but I haven’t taken a look at that.

Save the config changes and then restart minidlna with:

sudo service minidlna restart

3. Refresh Your Media LIbrary

By default minidlna refreshes your medial library every 895 seconds (controlled by the notify_interval setting in the conf file). However, if you’re impatient you can force a refresh with:

sudo minidlna -R
sudo service minidlna restart

Alternatively you can force the database refresh using:

sudo service minidlna force-reload

Once your library is refreshed you should see your new server available from your media device and be able to view your movies or listen to your music.

fancontrol Not Working after Resume from Hibernate

I setup fancontrol and lm-sensors on our new mini file server yesterday. I did it by following this fanspeed how-to article. However when I got up this morning after the server running Ubuntu had automatically woken from hibernation the fan was spinning at max RPM. I suspect it had reverted to manual fan control. This was fixed easily enough with:

sudo service fancontrol restart

But I don’t want to be doing that every morning. A bit of Googling suggested that this was a bug of unknown origins. There doesn’t seem to be any real fix so I decided on a work-around. This meant simply running a script when the file server resumed from hibernation. To do this I just created the following script in /etc/pm/sleep.d/20_fancontrol

#!/bin/sh

PATH=/sbin:/usr/sbin:/bin:/usr/bin

case "${1}" in
    resume|thaw)
      service fancontrol restart
      ;;
esac

Then I made the script executable with

sudo chmod +x /etc/pm/sleep.d/20_fancontrol

I quickly tested this with:

sudo rtcwake -u -m disk -t 09:00

And when the computer re-started the fan was spinning at the correct speed.

Building a New Mini File Server

So I completely lost confidence in our Mac Mini after the power surge issues and decided to build a new file server. I wanted something small and quiet built from standard components that would run Ubuntu server. I spent some time looking about and decided on the following build:

Case : Antec Mini ISK110 Vesa
CPU: Intel G2030 Pentium
CPU Cooler: Stock (if possible)
RAM: 4GB Generic
Motherboard: Gigabyte GA-H61N-D2V
Drives: 2x500GB 5400RPM 2.5″ laptop drives

Total cost was around AU$400. I ordered the case from an online vendor, the motherboard from eBay and the rest of the components were sourced from MSY Computers.
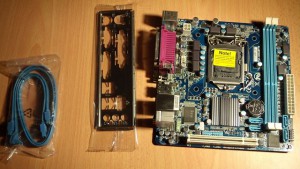
Gigabyte GA-H61N-D2V Motherboard

Gigabyte GA-H61N-D2V Motherboard

The mini-ITX format motherboard from Gigabyte (see above) shipped with a back plate and two HDMI cables. It has USB ports via the rear panel, has two RAM slots, 4 on-board SATA3 ports and supports any LGA1155 pin Intel PC. If the installed CPU has a GPU then there’s an available HDMI port too.
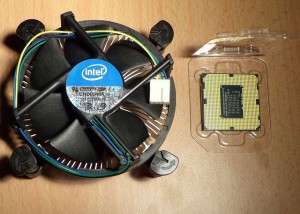
Intel G2030 Pentium and Stock Cooler

Intel G2030 Pentium and Stock Cooler

I chose the G2030 Pentium from Intel because it has on-board video, two cores, and a 55W thermal design load. And it was cheap. This is a file server so I didn’t see the need for excess CPU cycles. There’s a mobile version of the G2030 that has a TDP of 35W but that was more expensive and not available locally.
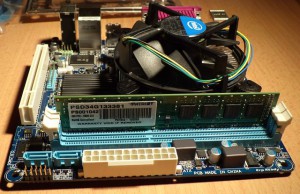
Motherboard with Installed CPU and RAM

Motherboard with Installed CPU and RAM

As I usually do I installed the CPU, fan, and RAM to the motherboard before the board went into the case. No issues here, everything went in smoothly. I was hoping the stock fan would fit in the small Antec case. If not I would have to purchase a low profile HSF unit like this Noctua unit. It turns out the stock fan DID fit and is very quiet at low RPM.
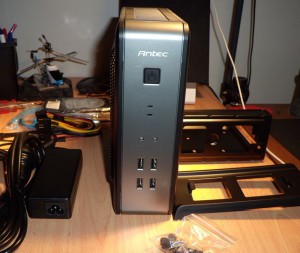
Antec ISK 110 Mini-ITX Case

Antec ISK 110 Mini-ITX Case

Above you can see the Antec case I chose. It comes with a 90W external power supply, has 4 USB2.0 front panel ports, has space for two 2.5″ drives internally and supports the mini-ITX motherboard format. It comes with a desk stand (which you can see on the right) and a VESA bracket so you could bolt it to the back of a monitor or TV. Ideal if you wanted a small format media PC or all-in-on PC solution. The case itself is about the size of a large format paperback novel. Quite a bit bigger than a Mac Mini but still very small.
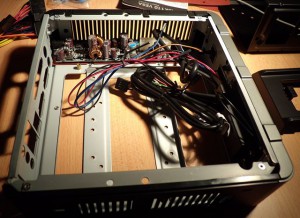
Antec ISK 110 Mini-ITX Case Internals

Antec ISK 110 Mini-ITX Case Internals

Here’s the guts of the case. The cables on the right are all for the front panel. At the top is the PSU.
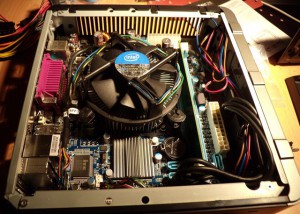
Motherboard Installed

Motherboard Installed

The motherboard went into the case without too much trouble. The front panel cables are stiff and impede on the area where the mother board wants to sit. So they need some bending to move them out of the way. Also, the back panel insert needs to be removed to fit the motherboard but it’s easily replaced with the back panel that shipped with the motherboard.
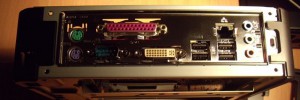
Back Panel

Back Panel

Here’s the back panel. The usual array of connections are available.
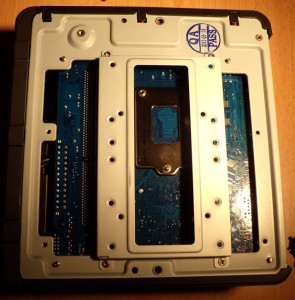
HDD Cage

HDD Cage

The cage for the two internal HDD’s is on the back of the case. In this image the cage is in the center of the image and attached by a screw at each corner. It was simply a matter of removing the cage and applying the included adhesive anti-vibration pads. You can see what this looks like below.
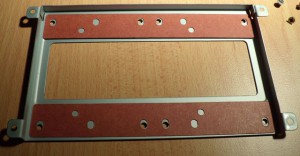
HDD Cage with Anti Vibration Pads

HDD Cage with Anti Vibration Pads

My two 2.5″ hard disks then simply screwed into the cage with the screws that were included with the case. The only issue here was to ensure that the drives were aligned correctly so that power cables and SATA cables could be routed easily to the drives.
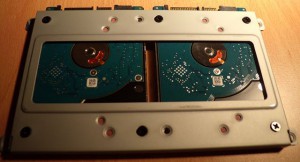
Hard Drives in Cage

Hard Drives in Cage

Once I’d screwed the cage back to the case and routed the SATA cables and power cables from the front of the setup looked very neat indeed. You can see what it looked like below. My only comment is that you’ll want two SATA cables with 90 degree bends on one end to make the job of connecting up the drives as easy as possible.
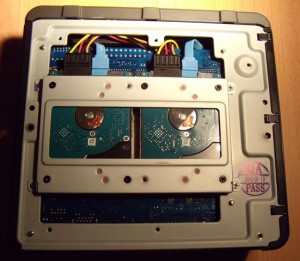
Hard Drive Installation Completed

Hard Drive Installation Completed

The final step in the process meant flipping the case back over and finishing off the cabling to the motherboard. The ATX power supply harness was very rigid and needed some work to get it bent to the shape I wanted. Once I’d done that the rest of the cabling was easy enough. I managed to tuck away a lot of the cables in the edge of the case out of sight to neaten things up. You can see the final result below. One comment I would make here is that while the Gigabyte motherboard does have a PCI-E slot I would be dumbfounded if you could fit a card in this case. There just doesn’t seem to be enough clearance.
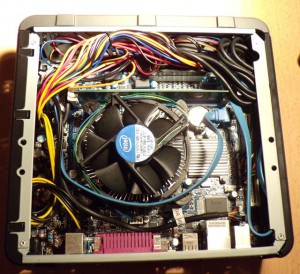
Cabling Complete

Cabling Complete

And here’s the final product with the sides of the case back on. Lot’s of ventilation means that it can run with the CPU fan idling away silently at 900RPM or so and there hasn’t been a need for a case fan at all. Admittedly it’s winter here and with room temperatures of less than 20 degrees Centigrade the CPU temperature has been sitting at about 40 degrees for several days now. I can wind the fan speeds up during the hotter parts of the year if needed.
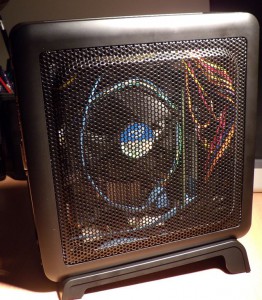
Completed Teeny Tiny Computer

Completed Teeny Tiny Computer

I installed Ubuntu Server 13.04 on the machine and setup the disks in a RAID1 configuration. Installation was very smooth and without issue. I even had time to do a few experiments removing the disks to make sure the computer still booted and I could recover data from the degraded array.