Monthly Archives: March 2017

Last updated by at .

WooCommerce – Custom Product Fields and WooCommerce Fields Factory

WooCommerce does have ‘attributes’ available for products but like most things in WC these are tailored for users selling clothing and various other consumer products. In my application each product is unique and once sold gone forever. Each product has common characteristics though, such as year of manufacture, metal it is made from, and where it was manufactured. As a matter of course the user of the WooCommerce store wanted to define a set of characteristics that would be entered when a new product was created and then wanted those characteristics displayed in the product listing. A good solution was arrived at through the use of the WooCommerce Fields Factory plugin and modifying the Storefront Single Product->Tabs->description.php template.

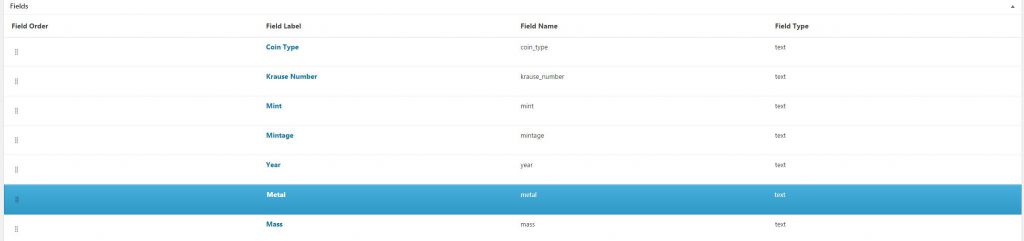
The WC Fields Factory plugin allows you to add custom fields to your WooCommerce products. It has the added benefit of allowing you to display those fields on the admin side where they can be edited at the product level by your shop admins. Nifty. In my application I created a group of Admin Fields called “Coin Attributes” and then populated the group with the fields that the customer wanted for their products.

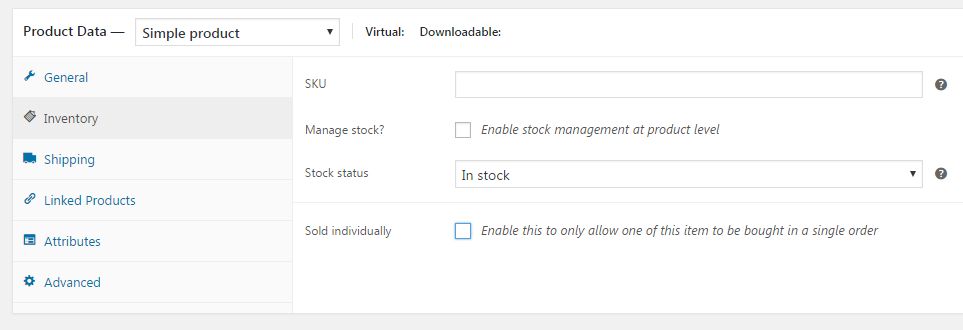
Once that was done and I made sure to check the Hide in Product Page and Hide in Cart & Checkout Page for each field. Now when I add a product I see this in the General tab for each product:

So now we can store the data with each product as needed. The next step is to make sure the data displays as required for products. The key is that we only want the data field to display if there’s a value set. To do that we just need to do a bit of tweaking to the Storefront Single Product->Tabs->description.php template. We do that by making a copy of it into the /woocommerce/single-product/tabs folder of our child theme. In our case we just wanted to display the data in a table. So the PHP code required looked like this:


<?php
    //get the custom field data using the get_post_meta function.  All WC Field Factory fields are prefixed with wccaf_ and then the field name
    $coin_type=get_post_meta( $post->ID, "wccaf_coin_type", true );
    $krause_number=get_post_meta( $post->ID, "wccaf_krause_number", true );
    $mint=get_post_meta( $post->ID, "wccaf_mint", true );
    $mintage=get_post_meta( $post->ID, "wccaf_mintage", true );    

//display information only if there's a value set
    $coin_information='';    
    
    if (strlen($coin_type)>0)
        $coin_information.='<tr><td class="coin-information"><strong>Coin Type:</strong></td><td class="coin-information">'.$coin_type.'</td></tr>';
    if (strlen($krause_number)>0)
        $coin_information.='<tr><td class="coin-information"><strong>Krause Number:</strong></td><td class="coin-information">'.$krause_number.'</td></tr>';    
    if (strlen($mint)>0)
        $coin_information.='<tr><td class="coin-information"><strong>Mint:</strong></td><td class="coin-information">'.$mint.'</td></tr>';         
    if (strlen($mintage)>0)
        $coin_information.='<tr><td class="coin-information"><strong>Mintage:</strong></td><td class="coin-information">'.$mintage.'</td></tr>';  

    if (strlen($coin_information)>0)
        echo '<table class="coin-information">'.$coin_information.'</table>';
?>

Of course where exactly you echo out the data in the TABS template is up to you and determined by how your product pages are laid out.
 

WooCommerce – Display SOLD Instead of Price for Sold Products

If you’re using WooCommerce and selling one-off products you don’t necessarily want to use the default terminology for sold out products. You might want to hide the sold price and remove the WooCommerce “In Stock” messages that are better suited to sites selling t-shirts and so on. Removing the stock availability messages is simple enough using the woocommerce_get_availability filter.

    add_filter('woocommerce_get_availability', 'my_get_availability', 1, 2);

    function my_get_availability($availability, $_product)
    {
        $availability = '';
    }

Couldn’t be any simpler, just set the availability text to an empty string.  Presto chango those messages are gone.

Replacing the price with SOLD when a product is sold is almost as simple, it just requires hooking into a couple more filters.

    add_filter("woocommerce_variable_sale_price_html", "my_remove_prices", 10, 2);
    add_filter("woocommerce_variable_price_html", "my_remove_prices", 10, 2);
    add_filter("woocommerce_get_price_html", "my_remove_prices", 10, 2);
    function my_remove_prices($price, $product)
    {
        if (!$product->is_in_stock())
        {
            $price = "SOLD";
        }
        return $price;
    }

WooCommerce – Add Phone Numbers to Header of Storefront Theme

I happen to like web stores that have contact details in prominent locations so it’s useful to be able to add phone numbers to the header of a site using WooCommerce. In my particular application I’m using the Storefront theme.  Firstly you need a  bit of CSS in your child theme’s style.css file. Your widths might be different and I’ve adjusted the margin of the site-search div to compress things a bit.

.header-contact-details {
    width: 50.7391304348%;
    float: right;
    margin-right: 0;
    clear: none;
}

.site-search{
    margin-bottom:10px;
}

Then you can use the storefront_header action to insert some code into the header.  To set the priority of the insertion have a look at the storefront header.php file.  In  my case I wanted the new HTML in between storefront_product_search and storefront_primary_navigation_wrapper so I set the priority to land in between those two.


//add phone numbers to header

    add_action('storefront_header', 'storefront_add_header_phone', 41);

    function storefront_add_header_phone()
    {
        ?>

        <div class="header-contact-details" style="text-align:right"><p style="color: rgb(64, 48, 74);font-weight:600;font-size:20px;"><i class="fa fa-phone" style="color:rgb(155, 126, 230)"></i> 555 555 555 (AUS)  <i class="fa fa-phone" style="color:rgb(155, 126, 230)"></i> +61 555 555 555 (INTL)</p></div>
        <?php
    }

The code is pretty clear, I make use of the font awesome font set to have some pretty phone icons and colour them to match the rest of the site style. Of course there’s a little bit of CSS inline here that could be moved into the style.css file but for now it works and I am happy with that. Here’s the what the end result looks like:

WooCommerce – Receive Copies of Customer Emails

If a user is new to WooCommerce it can be a little confusing what emails a customer is receiving and exactly what events are triggering the delivery of emails. To help alleviate the problem it can be useful to deliver copies of all customer emails (see the WooCommerce Email Notifications screen below) to another email address so they can be monitored.

WooCommerce Email Notifications Screen

In this case the woocommerce_email_headers() filter is useful. It allows you to intercept the email header and inject your own custom headers of the same form used by the PHP mail function. In my case I was happy to include a CC email address so I used this code:

//
//Send copies of customer emails to someone@somewhere.com
//
add_filter( 'woocommerce_email_headers', 'copy_customer_emails_headers_filter_function', 10, 2);

function copy_customer_emails_headers_filter_function( $headers, $object ) 
{
    if ($object == 'customer_completed_order' || $object == 'customer_invoice' || $object == 'customer_note' || $object == 'customer_on_hold_order' || $object == 'customer_processing_order' || $object == 'customer_refunded_order') 
    {
        $headers .= "CC: Someone <someone@somewhere.com>" . "\r\n";
    }

    return $headers;
}

The code itself is fairly self explanatory. It checks the passed object and if it’s one of the customer notification emails then the “CC: Someone <someone@somewhere.com>” . “\r\n” string is appended to the email headers. That email address will now receive a copy of all the emails sent to a customer. Of course the customer will see the CC address in their emails so you could include a BCC address with something like “Bcc: Someone<someone@somewhere.com>\r\n”.

WooCommerce – Default Manage Stock and Sold Invidually Values

I’ve had the somewhat dubious pleasure of launching a new WordPress / WooCommerce site for an established collectables business. The site replaced an aging cart system, that was frankly a steaming pile. Almost every item sold by this business is unique so they wanted to default the values for Manage Stock to true and Sold Individually to true.

The WooCommerce Inventory Screen

It turns out the easiest way to do this is to add some javascript to the admin_enqueue_scripts action that checks the form elements we need checked. Poking about with the Chrome element inspector at the WooCommerce stock handling form told me we needed the _manage_stock and _sold_individually checkboxes ticked and to set a value in the _stock text field. Here’s the code I put in my child theme’s functions.php file.

//
//set default stock handling values
//

    add_action('admin_enqueue_scripts', 'wc_default_variation_stock_quantity');

    function wc_default_variation_stock_quantity()
    {
        global $pagenow, $woocommerce;

        $default_stock_quantity = 1;
        $screen = get_current_screen();

        if ( $pagenow == 'post-new.php' && $screen->post_type == 'product')
        {
            ?>
            <script src="//ajax.googleapis.com/ajax/libs/jquery/1.8.2/jquery.min.js"></script>
            <script type="text/javascript">
                jQuery(document).ready(function () {
                    if (!jQuery('#_manage_stock').attr('checked')) {
                        jQuery('#_manage_stock').attr('checked', 'checked');
                    }
                    if ('0' === jQuery('#_stock').val()) {
                        jQuery('#_stock').val(<?php echo $default_stock_quantity; ?>);
                    }
                    if (!jQuery('#_sold_individually').attr('checked')) {
                        jQuery('#_sold_individually').attr('checked', 'checked');
                    }

                });
            </script>
            <?php
        }
    }

The code itself is fairly simple. The javascript is injected into the document.ready function but only if we’re adding a new post and the post type is WooCommerce’s product post type. The appropriate checkboxes have their checked attribute set to true and the _stock field is set to a value of 1 if it’s currently zero. Simples!