A I mentioned in a previous post we had some power surge issues here recently. And our file server, a 2011 vintage Mac Mini called “Einstein” was one of the victims of the the surge. I don’t want to talk much about the accredited Mac repair shop that tried to repair the Mac Mini. But suffice to say, they didn’t. They did replace one of the HDDs and tinker with it a bit. And I gave them some money for doing so. The result of this was that three weeks after the power surge I was lighter in the pocket and had a Mac Mini that supposedly worked fine yet would crash repeatedly when sitting on the desk in my office.
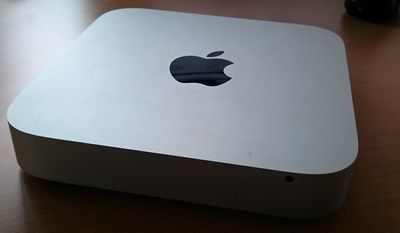
Einstein – A 2011 Mac Mini with 2GB of RAM and dual 500GB Hard Disks
I needed the Mac Mini working or failing that, something else. Something to act as a file server and something with a Unix based operating system on it so I can run CRON jobs and do various other things. So, I decided to have one last go at getting “Einstein” working. And this time I decided on something drastic. Ditch MacOS 10 and try installing Linux (namely Ubuntu server) on it. There were three reasons for this. Firstly, the Mac repair place assured me they could find nothing wrong with the hardware in the computer so presumably there was something wrong with the OS. Second, I am moderately comfortable with Ubuntu server because it’s what’s running on my managed web servers. And finally, I hated MacOS 10 Server with a passion. The GUI is awful and I always found myself dropping to the command line to do things.
So, no guts, no glory. Let’s install Linux on the Mac.
1. Create a Bootable USB Drive
Einstein is a dual 500GB HDD Mac Mini with 2GB of RAM and no optical drive. So, the only sensible way of getting an OS on it was via a USB stick. I grabbed a spare 8GB stick, downloaded Rufus and created a bootable stick using the ISO I had of Ubuntu 12.04 LTS. Putting the stick into the back of the Mac I held down the left ALT button on my keyboard and booted it up and was shown the boot device menu. There I could see both internal hard disks which were setup in a bootable RAID 1 array. But no USB stick. Bother. A bit of Googling later and I’ve found out Mac Mini’s don’t have BIOS they have UEFI to link their software and hardware and therefore they require a bootable USB stick to be setup for a UEFI computer.
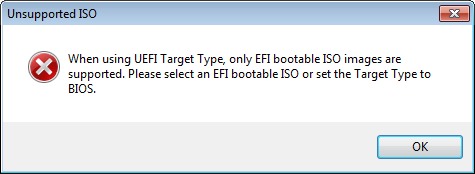
Rufus provides a few options for the partition scheme and the target computer type, one of which is GPT Partition Scheme for UEFI computer. I selected this option and tried to build the USB stick again but Rufus complained with the following message:
“When using UEFI Target Type, only EFI bootable ISO images are supported. Please select an EFI bootable ISO or set the Target Type to BIOS”
Rufus Doesn’t Like the Ununtu 12.04 ISO
Off to the Ubuntu website I go and download Ubuntu Server 13.04 which it says supports UEFI computers. I rebuilt the USB stick, rebooted the Mac to the boot device menu and hey presto there’s my USB stick! Victory!
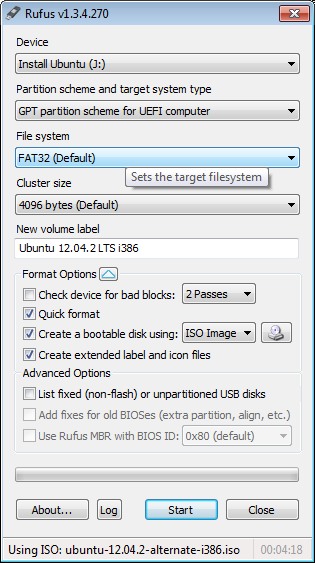
My Rufus Settings
2. Boot the Mac Mini to the boot device menu
This is simple, just boot up the Mac Mini and hold down the left ALT key. After a brief pause you’ll be shown the boot device menu which looks something like that shown below.
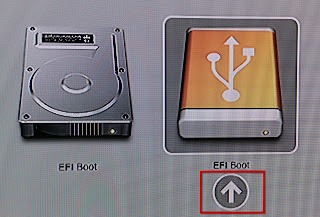
Mac Mini Boot Device Menu
The EFI boot option was my USB stick. I clicked on that and booted into the Ubuntu installer.
3. Install Ubuntu Server
I won’t take you through the entire process of setting up Ubuntu server on the Mac. I encountered a few snags on the way that were almost all to do with getting the two 500GB disks working in a RAID 1 format. The Ubuntu install script does an admirable job holding your hand through the raid setup process (this is the first time I’d ever done it) but there were a few hiccups along the way.
The first, was that one of the disks just wouldn’t be setup with a UEFI boot partition. It just refused. I don’t know if some HDD’s only allow MBR boot partitions or not. But one of these HDDs just got persnickety and refused to cooperate. So, after much fiddling about I ended up with the following partitions on the drives.
HDD1 (/dev/sda)
100 MB UEFI Boot Partition
50GB ext3 partition mounted as root
400 GB raid partition
50 GB swap partition
HDD2 (/dev/sdb)
400 GB raid partition
100 GB ext3 mounted as /usr
I setup /dev/md0 as my raid array using the two 400GB partitions as the members of the array and mounted /dev/md0 as /srv.
This solution isn’t ideal because if /dev/sda goes down I won’t be able to boot the Mac as I couldn’t make /dev/sdb bootable. But that’s not the end of the world. I can still boot it up via my handy USB stick and get the data off of the drive onto an external HDD if needed.
4. Give the Mac a Fixed IP
Now I needed to get Einstein on the network. I wanted to give it a fixed IP. So I used:
sudo nano /etc/network/interfaces
And changed the settings for eth0 from dhcp to the following:
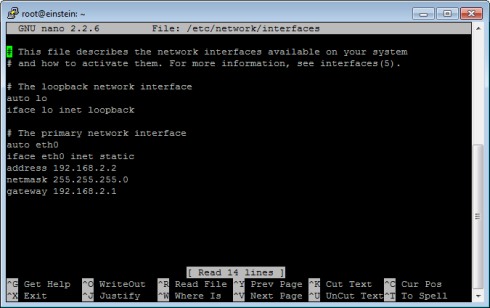
Einstein’s Interfaces File in a PuTTy Session
Then it was a matter of restarting the networking process with:
sudo /etc/init.d/networking restart
5. Setup a Simple Windows Share
As part of the install process for Ubuntu I’d chosen to install Samba. Now it was just a matter of setting up a simple share of my RAID array to allow the Windows PC’s on my network to access Einstein. Here’s how I did that:
sudo nano /etc/samba/smb.conf
Then change
workgroup = myWorkGroupName
security = user
And add this entry at the bottom of the file:
[share]
comment = Einstein File Share
path = /srv/windows-share/
browsable = yes
guest ok = yes
read only = no
create mask = 0777
Save those changes, exit the text editor and then enter the following:
mkdir -p /srv/windows-share/
chown nobody.nogroup /srv/windows-share/
restart smbd
sudo restart nmbd
Once I’d done that it was simply a matter of going to a Windows PC and typing:
\\Einstein\
into Windows explorer and I could see the new shared drive.
6. Setup a GUI for Ubuntu Server
Next I decided to install a GUI for the new server. And surprised I was to read that only wimps have GUI’s on their servers. But hey, I am a wimp, and I like to have multiple terminals open. I went ahead and installed lightdm which is the default GUI and display manager for Ubuntu. I did it with this:
sudo apt-get install ubuntu-desktop
However, I experienced a lot of graphical glitches with this. Perhaps it’s not fully supported on the video card in the Mac. Who knows. I got around it by installing another display manager with:
sudo apt-get install xdm
When I started the GUI next time Ubuntu asked me if I wanted to use LightDM or XDM. I chose XDM and the GUI has worked fine ever since.
For those that are interested you can exit from the GUI using CTRL-SHIFT-F1. And if you want to restart the GUI just enter
sudo /etc/init.d/xdm start
Conclusions
I don’t trust Einstein just yet. It’s been up and running for 48 hours without issue but I don’t want to trust my files to it just yet. Right now it’s running some CRON jobs in tandem to my existing cobbled together file server. I’ve also got it syncing some files from my main PC to see how it goes doing that. I’ll let it do this for a week or so and use it to serve some live files for some of my less important tasks. Once I’m happy it’s working OK I’ll do a data integrity check on the files it’s holding. If it passes that then Einstein will be back in the good books and I’ll put it back into live operation again.
Other Useful Stuff
Here’s some other useful things I found out through this process.
To set the default text editor in Ubuntu (I can’t use vi or emacs) using:
sudo /usr/bin/select-editor
I know enabling su is a security risk but I got sick of typing sudo. So to enable su just use this:
sudo passwd root